Kitchen layout: getting the floor plan right
The kitchen layout that adds $7k–$10k if you move the plumbing: six floor plans, Australian clearances, work zones and when to keep the wet wall.
Layout is the decision that locks the budget in
Almost every kitchen guide on the internet starts with finishes. Pick the cabinetry colour, choose the benchtop, decide on tapware, build a moodboard. The layout is treated as a constraint that the room imposes rather than a choice that has to be made deliberately. That order is wrong. Layout is the decision that locks the budget, the decision that decides how the room actually works for the next twenty years, and the decision that is genuinely difficult to reverse.
The cost gap between a layout that fits the existing plumbing and a layout that does not is wide. Moving the sink, cooktop or fridge to a new wall typically adds $3,000 to $9,000 in plumbing, gas and electrical relocation alone, before any cabinetry change. The wider trade rule of thumb is that keeping the existing kitchen footprint costs 20 to 30 per cent less than a relocated footprint for an equivalent finish. On a $35,000 mid-range renovation, that gap is $7,000 to $10,500. It is the highest-leverage decision in the project.
This guide is the layout-only piece. The wider kitchen renovation guide covers the full project from brief to handover, the kitchen renovations on a budget guide goes deep on cost, and the small kitchen ideas guide covers compact rooms specifically. This page sits one level above all three: how to read the room, choose between the six working Australian kitchen layouts, clear the Australian dimensions every layout has to respect and test the result before any cabinetry is ordered. Get this part right and the rest of the renovation gets cheaper, faster and noticeably better.
Start with the room and the cook, not the layout
Before any decision about which layout to use, you need four things on paper. The wall-to-wall width of the room and the wall-to-wall length. The position of the existing waste pipe under the sink and the gas point at the cooktop. The position of any window the kitchen has to keep using. And a short, honest description of how the kitchen will actually be used.
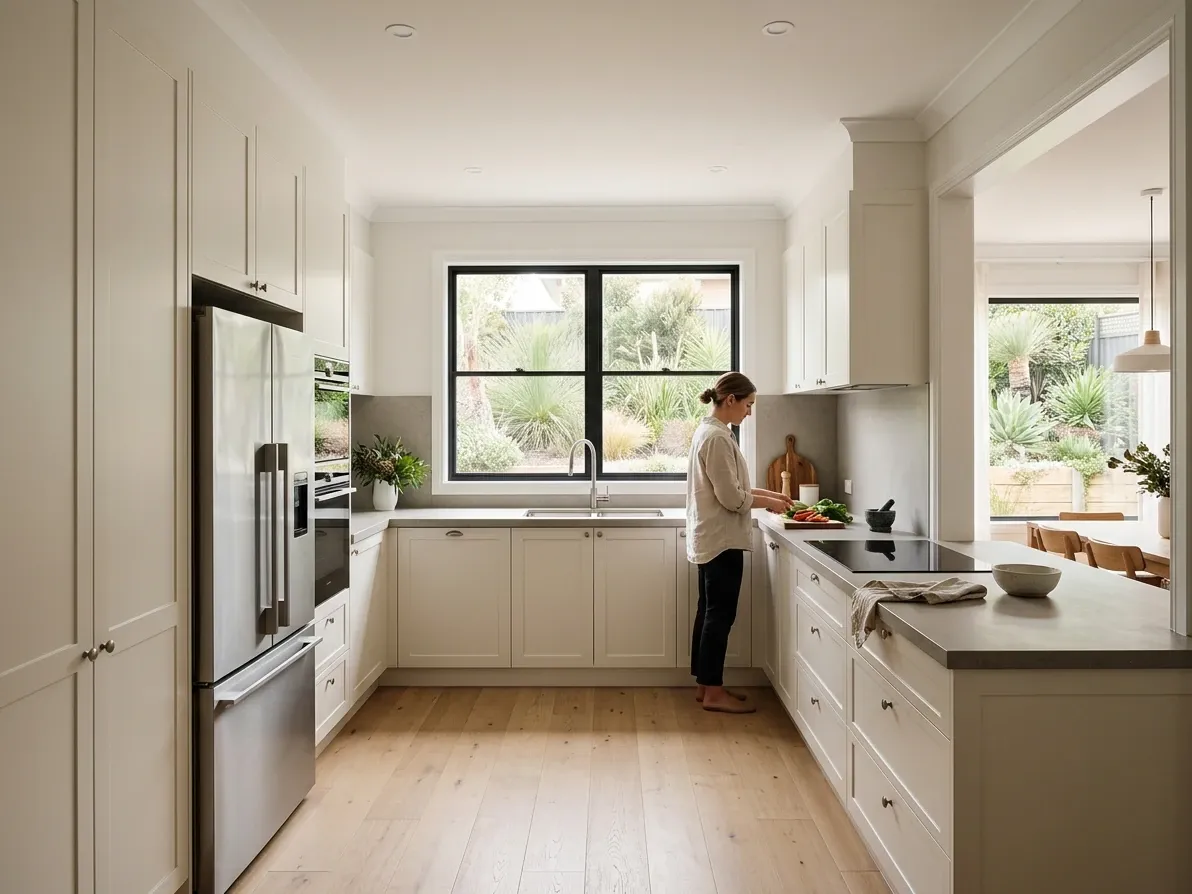
The first three are constraints. The fourth is the brief. Measure twice on the room dimensions; older Australian houses are rarely square and a 50 mm slope across the long wall can change which fridge fits. The sink waste and the gas point are where the kitchen currently is plumbed in, and the cheapest place for both to stay. Wherever the existing window sits is usually where the main run ends up, because window-mounted overhead cabinets are awkward and most layouts put the sink under the window for the daylight.
The brief part is the one most people skip. Write down how the kitchen gets used on a normal weekday evening and a normal weekend. Who cooks. Who cleans up. Where two people end up at the same time. Whether one of you preps while the other cooks. Whether the kids do their homework at the bench. Whether the dog’s bowl needs a parked spot. Whether you actually entertain or just say you do. The layout follows from that.
A household where one parent meal-preps every Sunday and the other does weeknight dinners needs two separate prep zones and is a candidate for a U-shape with a separate scullery. A single cook in a one-bedroom apartment needs the work triangle held tight on a single wall. A couple who eats out four nights a week and entertains six people every other Saturday wants an island they can stand at, not a U-shape they get locked inside. The shape of your week decides the shape of your kitchen.
Most Australians cook inside a house, not an apartment
The building you are renovating shapes what is possible before any layout choice is on the table. In a freestanding house with timber floors, almost any layout change is technically achievable, even if some are expensive. On a concrete slab on ground, moving the sink or cooktop is significantly worse because the slab has to be cut and re-poured. In an apartment, the strata regime and the building’s plumbing risers narrow the options further; what you can move is limited to wherever the existing waste stack and gas rough-ins already are.
According to the 2021 ABS Census of Population and Housing, Australia had 10.85 million private dwellings, with separate houses accounting for 70 per cent, apartments 16 per cent and townhouses or semi-detached units 13 per cent. The implication for kitchen layout decisions is direct. Two thirds of Australian kitchens sit inside detached houses where the layout is technically wide open and the cost of change is the deciding factor. One in six sits inside an apartment where the strata rules and the shared services pin the layout to wherever it already is, regardless of budget.
- Houses7,60071%
- Apartments1,74016%
- Townhouses1,41013%
The other variable inside the dwelling is the age of the house. Pre-1990 Australian homes were built around closed kitchens, and the wall between kitchen and dining is almost always non-structural and can be removed cheaply. Post-2000 builds were designed open from the start, and the kitchen sits inside the open footprint already. The closed-to-open conversion is the single most common Australian kitchen renovation, and it almost always brings in the island.
Two planning frameworks, used for different layouts
There are two design frameworks worth knowing. The older one is the work triangle. The newer one is the five-zone method. They are not in conflict, they apply to different kitchens.
The work triangle joins the three points the cook moves between most: the fridge, the sink and the cooktop. The convention, codified by the National Kitchen and Bath Association in the 1940s and still cited by Australian designers today, is that each leg sits between 1.2 and 2.7 metres, the three legs together sum to between 4.0 and 7.9 metres, and no full-height obstacle intrudes more than 300 mm into any leg. The point is to keep the three points close enough that the cook is not pacing, but far enough apart that two people can be at one of the points without crowding the other. The triangle is still the right framework for any kitchen with one main cook: single-wall, galley, L-shape, smaller U-shape.
The five-zone method, used widely in modern Australian planning, replaces the triangle with five functional zones laid out in the order the cook moves between them: consumables (the fridge and pantry), non-consumables (dishes and cutlery), cleaning (the sink and dishwasher), preparation (the main bench), and cooking (the cooktop and oven). For a right-handed cook, the zones run clockwise; for a left-handed cook, counter-clockwise. The zones framework is the better fit for larger kitchens, open-plan layouts and two-cook households because it accepts that one cook can be at the cooktop while another is at the island prepping. It is the framework most Australian designers reach for on U-shapes with islands, peninsula layouts, and any kitchen with a scullery.
Use the triangle for compact layouts where the cook moves between three points. Use the zones for larger layouts where multiple people are in the kitchen at the same time and the prep is genuinely separate from the cleanup.
Generous walkway clearance is what makes a kitchen feel calm to work in.
The Australian dimensions every kitchen layout has to respect
Australian planning of kitchen layouts sits on a small set of repeated numbers. Every layout in this guide has to clear them. Most of them are industry convention rather than National Construction Code requirements, but ignoring them produces a kitchen that does not work.
Bench height is 900 mm. Bench depth is 600 mm for cabinetry against a wall, and 900 mm for an island so 600 mm of cabinet can sit on one side and a 300 mm seating overhang on the other. Anything wider than 300 mm of unsupported overhang needs structural support to stop the stone cracking. Bench length should give you at least 600 mm of clear preparation surface next to the cooktop and at least 600 mm next to the sink. Less than that and the bench stops being usable.
Walkway widths are the most commonly broken rule. The minimum clear floor between opposing benches, or between a bench and the island, is 900 mm, and 900 mm is genuinely the floor; anything narrower stops being a kitchen. The comfortable working width is 1000 to 1200 mm, which is what almost every Australian kitchen design firm recommends. For two cooks to work side by side without bumping, 1400 mm is the target. Anything past 1500 mm starts to feel disconnected and the cook ends up pacing across the gap.
Island clearance is a stricter version of the same rule. Every side of the island that opens to the room needs at least 1000 mm of clear floor, and 1200 mm is the comfortable working number. The reason is appliance doors: an oven, a dishwasher and a fridge all open outward, and a 600 mm dishwasher with a person standing in front of it eats 1100 mm of floor. If the walkway is only 900 mm, the dishwasher cannot open when someone is at the island. Plan the clearances around the appliance doors and the person standing in front of them, not around the empty floor.
The kitchen work triangle limits are the older convention but they still hold. Each leg between 1.2 and 2.7 metres, total sum between 4.0 and 7.9 metres, no full-height obstacle intruding more than 300 mm. If the triangle is too tight, two cooks crowd each other. If it is too loose, the single cook ends up walking the length of the room every time the kettle boils.
The last number is appliance landing space. Australian kitchen designers usually plan for 400 mm of clear bench on either side of the cooktop, 400 mm next to the fridge on the handle side for unloading, and 600 mm on at least one side of the sink for stacking. These are not enforced anywhere; they are the difference between a kitchen that works and a kitchen that looks finished but is not.
Single-wall: the layout of choice for one and two-bedroom apartments.
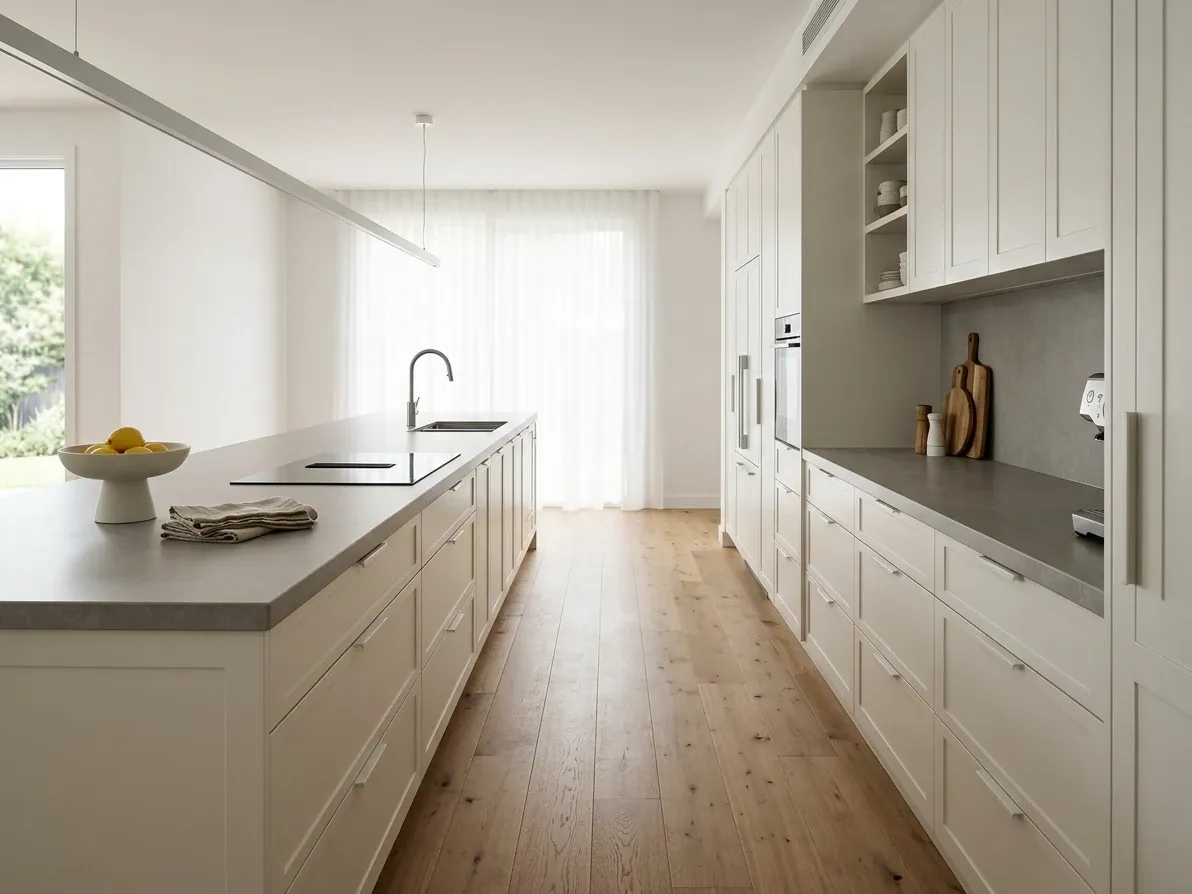
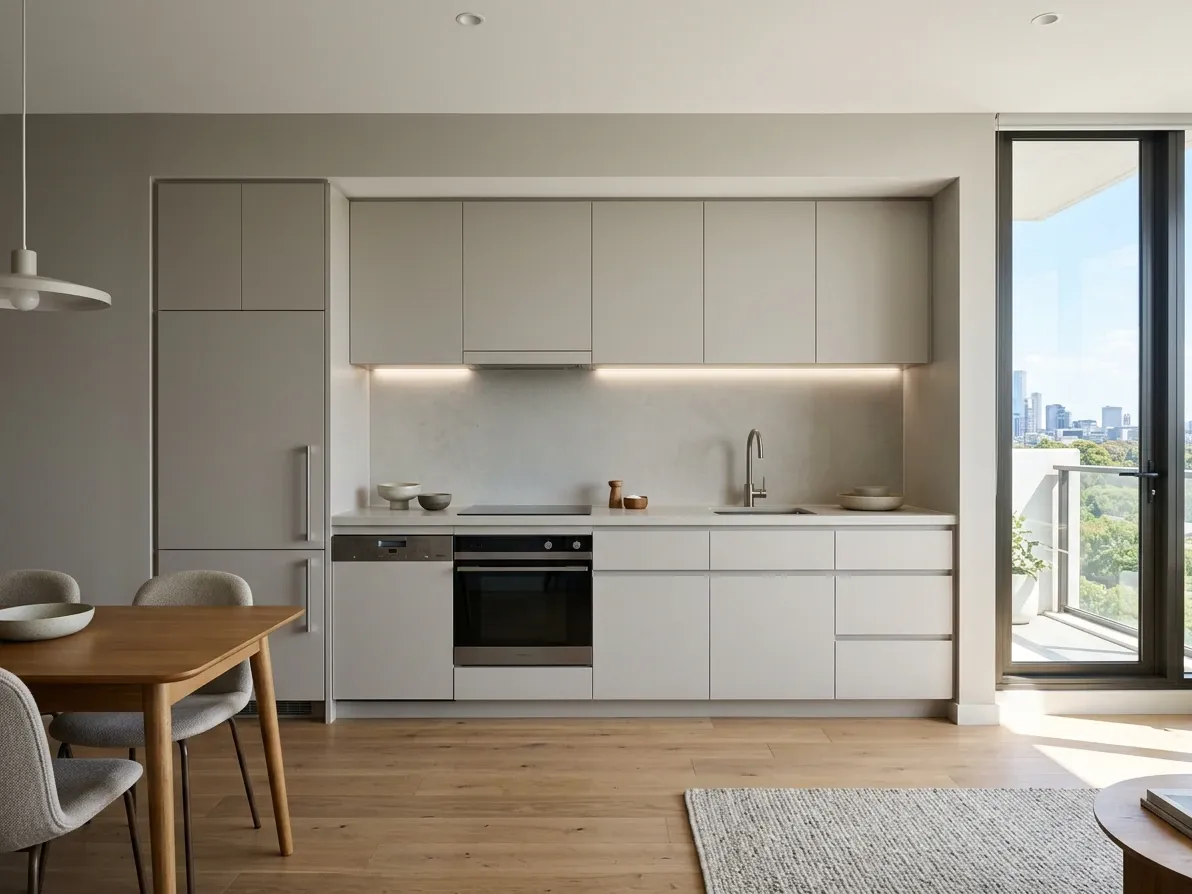
Single-wall kitchens
The single-wall kitchen, sometimes called the one-wall or straight-line layout, runs every component along one wall. The fridge sits at one end, the cooktop and oven at the other, the sink and dishwasher in the middle, with the main bench between them. There is no second run of cabinetry. The work triangle collapses to a work line, and the cook moves left to right rather than between three points.
Single-wall is the layout of choice for almost every Australian one- and two-bedroom apartment. It is also the cheapest layout to build, full stop. One plumbing wall, one set of electrical runs, one row of overhead cabinetry, no corner cabinet to engineer. A flat-pack single-wall kitchen in a small apartment can be installed for under $10,000 including appliances.
The working dimensions are tight but defined. The clear wall needs to be 3.0 metres minimum, and 3.6 metres is the comfortable width. The breakdown is roughly 600 mm for the fridge, 900 mm for the sink and dishwasher, 600 mm for the prep zone, 600 mm for the cooktop, plus a 300 mm filler at either end. Below 3.0 metres something has to give, almost always the dishwasher. The opposite side of the room needs at least 1200 mm of clear floor for the cook to step back and for two people to pass.
Single-wall fails when the cook has to walk too far between the fridge and the cooktop, or when the bench between the sink and cooktop is under 600 mm. A 5-metre single-wall kitchen with the fridge at one end and the cooktop at the other looks generous in the showroom and is exhausting to cook in. If the room can carry more, an L-shape is almost always a better layout than a stretched single-wall.
The single-wall is also the right answer for any small home where the kitchen is genuinely a service space rather than a social one. Studios, granny flats, holiday cabins and second kitchens in dual-occupancy builds all default to it. Adding a kitchenette layout inside a studio is the same logic at smaller scale.
Two parallel runs make a galley the most efficient single-cook layout.
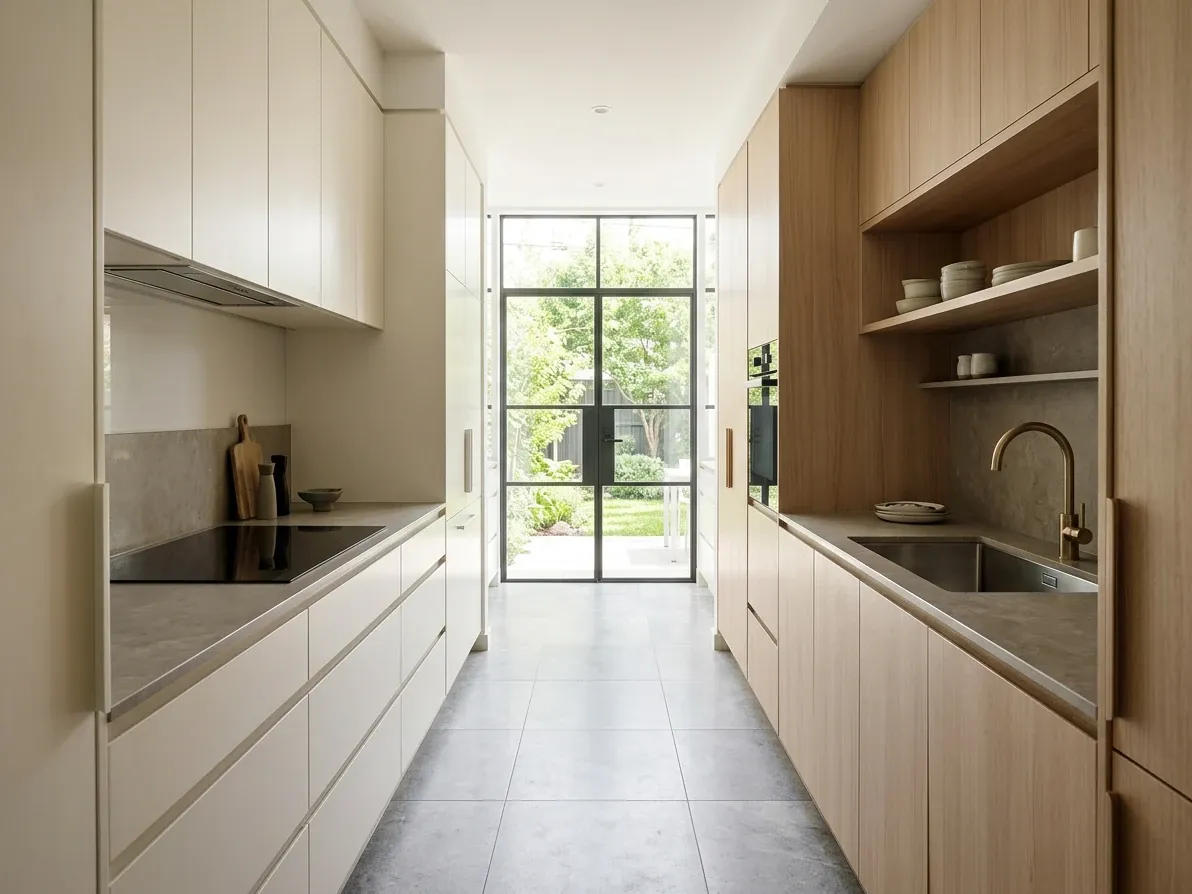
Galley kitchens
The galley puts two parallel runs of cabinetry facing each other, with a walkway between them. The name comes from ship galleys, where the same layout for the same reason has been used for a hundred years: the cook stands in the middle and reaches everything within a step. It is the most efficient layout for one cook because the work triangle compresses into a corridor and the maximum distance between any two points is the length of the walkway.
The working dimensions for an Australian galley are a room width of 2.2 to 2.6 metres and a length of 2.7 metres or more. The width breaks down to two runs of 600 mm cabinetry on opposing walls plus a walkway of 1000 to 1200 mm. The 900 mm absolute minimum walkway is workable for a single cook but uncomfortable for two; 1200 mm is the sweet spot for any household with more than one person in the kitchen.
The defining decision in a galley is which side carries the wet services and which side carries the cooktop. The conventional Australian arrangement puts the sink and dishwasher on the side under the window for the daylight, with the cooktop, oven and fridge on the opposite wall. Splitting wet from hot keeps the work triangle balanced and stops the cook from turning hot pots across the walkway with someone walking through.
Galley fails the moment a second cook tries to share it. Two people in a 1000 mm walkway cannot pass without one stepping into a cabinet door, and any open appliance door blocks the corridor entirely. Two-cook households should plan for the 1400 mm walkway or move to a layout where the cooks can stand at right angles instead of face to face.
Adding an island to a galley is almost always a mistake. The geometry that makes a galley work is the short reach across a narrow walkway; an island in the middle breaks the reach and turns the walkway into a U around the obstacle. If the room is wide enough to carry an island, it is wide enough to carry an L-shape or a U-shape, and either of those is a stronger choice than a galley plus island.
The L-shape works inside almost any rectangular Australian room.
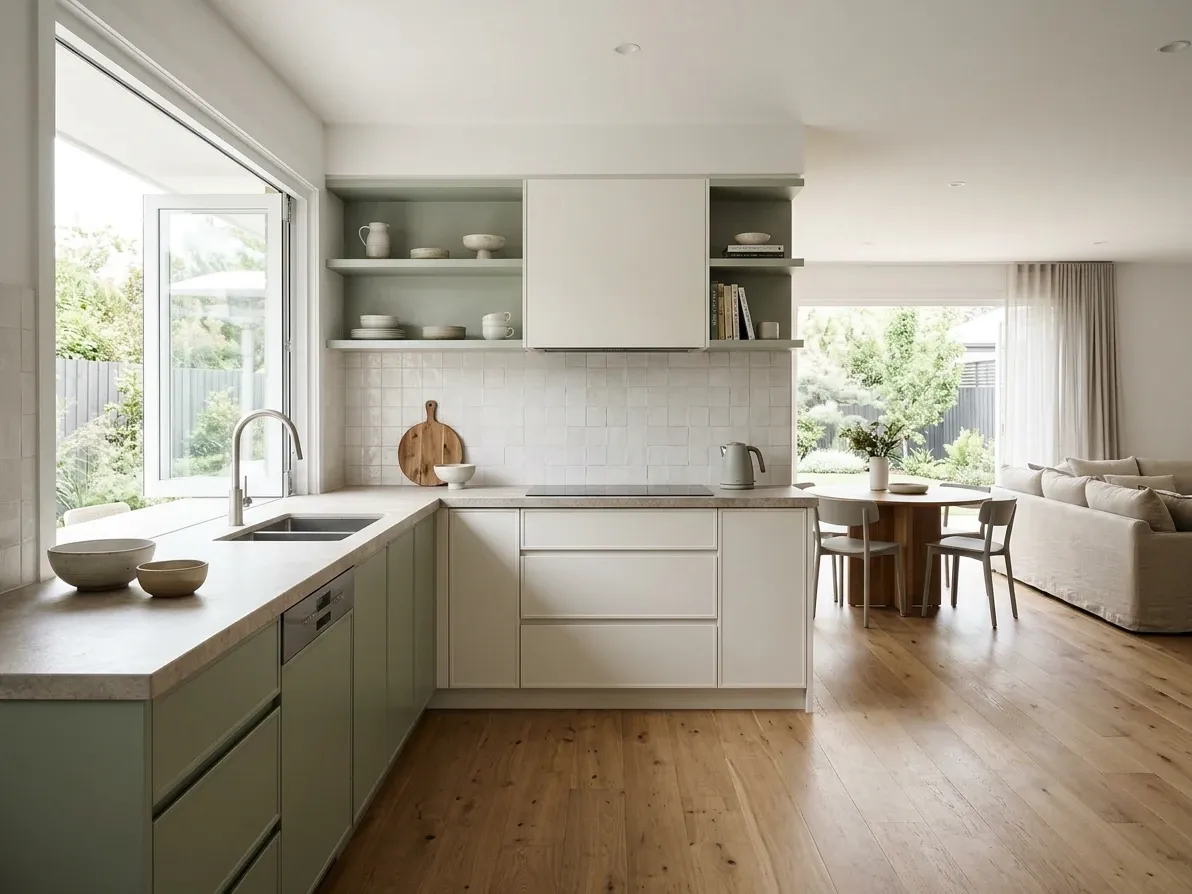
L-shaped kitchens
The L-shape puts two runs of cabinetry on adjoining walls meeting at a corner. It is the most common single-zone Australian kitchen layout because it works inside almost any rectangular room and it opens the kitchen to a dining or living area along the open side. The work triangle sits comfortably inside an L, with the sink and cooktop on the two arms and the fridge near the corner or at one end.
The working dimensions are forgiving. The longer arm needs about 3.0 metres for a comfortable run of fridge, sink and prep. The shorter arm needs 1.8 to 2.4 metres for the cooktop, oven and a working bench. The corner becomes the awkward cabinet, and the choice there is between a blind corner (deep, cheap, hard to reach), a corner pull-out (expensive hardware, much better access) and a magic-corner mechanism (the best access, the most expensive hardware). In a mid-range Australian kitchen the corner pull-out is the standard answer; on a budget renovation the blind corner with a lazy susan is the honest compromise.
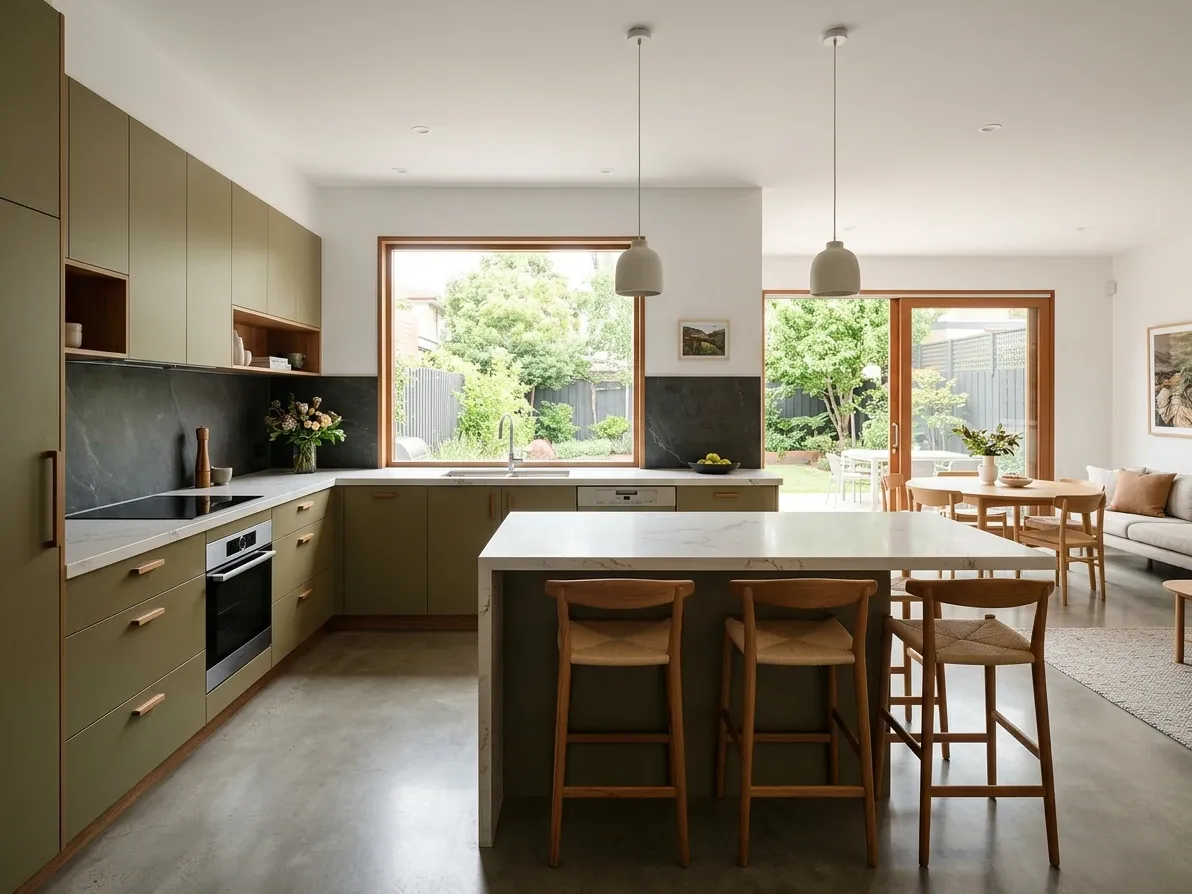
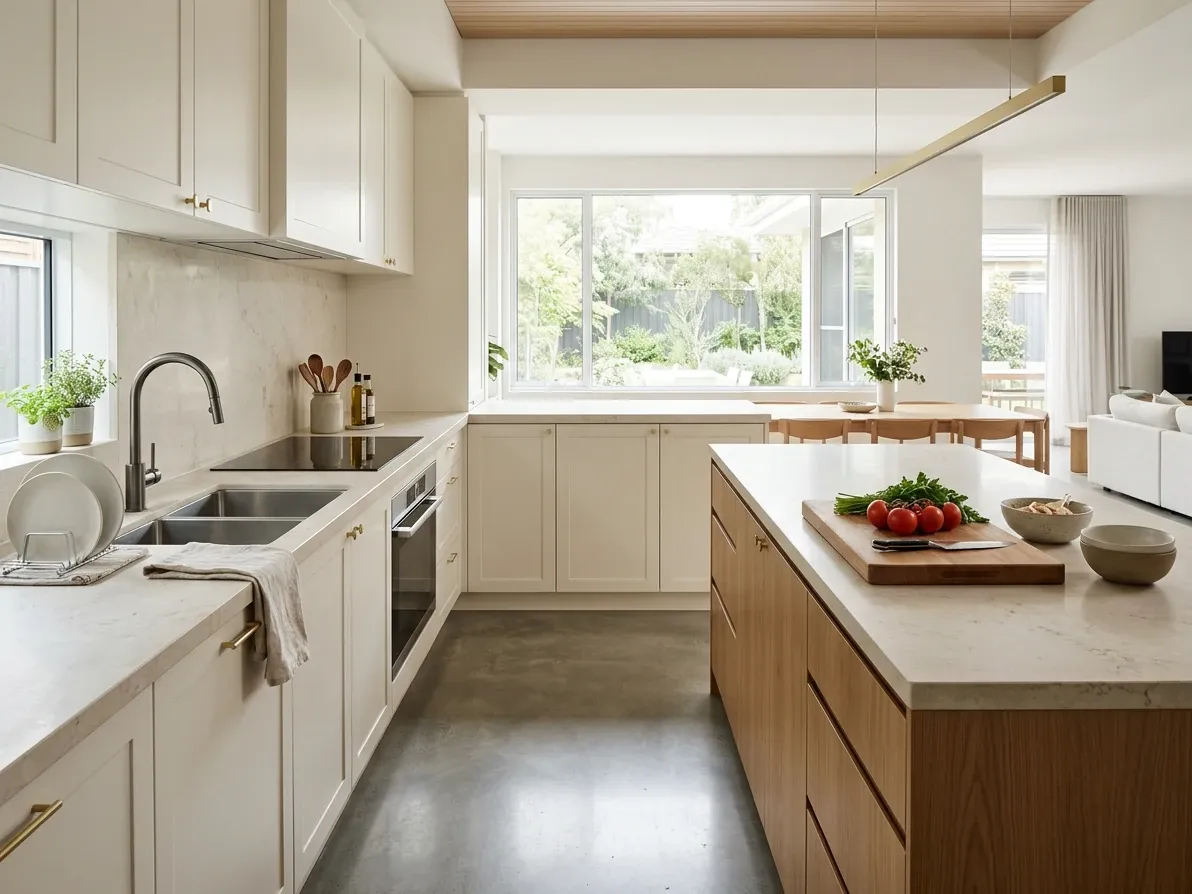
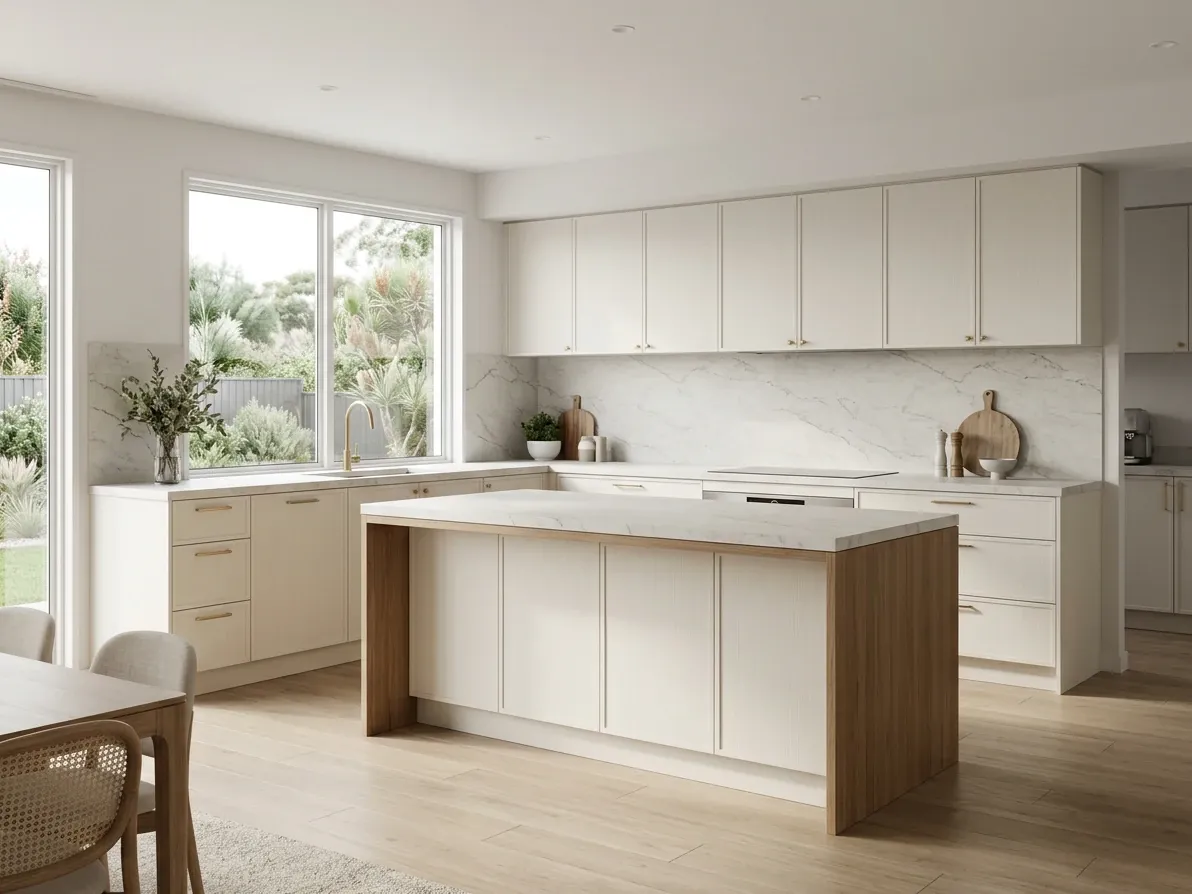
The L-shape carries an island gracefully. Almost every open-plan Australian kitchen is technically an L plus island rather than a true U-shape, because the L gives the corner cabinetry and the island gives the second prep zone and the seating. The clearance between the inside face of the L and the island needs to be 1000 to 1200 mm on the working side and 900 mm on the seating side.
L-shape fails when the room is too narrow to give one of the arms its 1.8 metre minimum. In a long, narrow rectangle the L compresses to a single-wall plus a token end run, and the corner ends up unusable. It also fails when the open side of the L faces away from the daylight, leaving the working benches in shadow.
The L is the default Australian layout for kitchens between 8 and 14 square metres, and the right answer for most renovations where the existing kitchen sits in a closed room being opened up to the living area. If the bones of the room push you toward an L, take it; it almost always works.
The U-shape gives the most bench and storage per square metre.
U-shaped kitchens
The U-shape uses three walls of the room, with cabinetry running continuously around the perimeter. The fridge, sink and cooktop sit at three different points of the U, and the cook stands inside the U facing whichever zone is in use. It produces the most bench space and the most storage per square metre of any layout. It is also the most demanding layout on room shape.
The working dimensions are strict. The room needs to be at least 2.4 metres wide at the closed end of the U so two cabinetry runs of 600 mm leave 1200 mm of clear floor between them. The room needs to be at least 3.0 metres deep to give each arm its 2.4 metres of run plus a turn. Below those numbers the U feels closed in, the corners are wasted, and the cook spends the entire time turning around. Above about 3.6 metres wide the U starts to feel disconnected, and the cook is walking from arm to arm rather than turning between zones.
The U is the strongest layout for the serious single-cook household, the one where the same person does most of the prep, cooking and cleanup. Every zone is within a quarter-turn. The work triangle compresses inside the U and the legs are short. The two arms of the U become natural prep zones, with one arm for hot prep next to the cooktop and the other for cold prep next to the sink and fridge. Storage is everywhere, with three runs of overhead cabinetry instead of two.
The U fails in open-plan rooms because it puts the cook with their back to the room. An open-plan U is functionally a closed kitchen with the back wall missing. Most open-plan Australian renovations therefore move to L-plus-island instead of U-plus-island, even when the room could carry either. If the household genuinely wants the U geometry for the storage and the cooking flow, the right answer is to keep the kitchen as a defined room and add a wide pass-through to the living area, rather than open the whole wall.
The U is also a strong answer for households with two regular cooks who can stand at right angles to each other, one at the cooktop arm and the other at the sink arm, with the third arm carrying the prep. Side-by-side cooking does not work in a U; right-angle cooking does.
A peninsula gets you island geometry without the under-floor services.
Peninsula and G-shaped kitchens
The peninsula extends one arm of an L or one end of a U into the room without joining the opposite wall, creating a fourth side that is fixed to the cabinetry but free at the other end. The G-shape is the formal name when the peninsula attaches to a U, making the kitchen a closed loop on three and a half walls. In practice most Australian peninsulas attach to an L, so the kitchen is an L-plus-peninsula rather than a true G.
The peninsula does most of what an island does, with a key difference. It is fixed to the cabinetry, so it shares plumbing, gas and electrical with the main run rather than needing its own run under the slab. That makes it materially cheaper to build than an island. An equivalent peninsula and island differ by about $2,000 to $4,000 in trade cost alone for the under-floor services, before any cabinetry difference.
The trade-off is circulation. An island sits in the room with clear floor on all four sides; a peninsula breaks the room into two zones with only one walkway between them. That walkway is the choke point of the entire kitchen and is also the choke point between the kitchen and the rest of the open-plan area. Plan it at 1200 mm minimum, and 1400 mm if the kitchen opens onto a dining table the family carries food to.
The working dimensions for a peninsula are room width of 3.2 to 3.6 metres at the narrow end. The breakdown is 600 mm main run plus 900 mm peninsula plus 1200 mm walkway plus 600 mm of free floor at the open end of the peninsula. The peninsula itself wants to be at least 2.1 metres long; below that the seating face becomes too short to be useful.
The peninsula is the strongest answer when the room can carry the geometry of an island but the budget cannot. It is also the natural answer in long, narrow rooms where an island would either block the through-traffic or feel marooned in the middle. In an apartment renovation where the kitchen opens onto the living room and the budget will not cover full island plumbing, the peninsula is almost always the right call.
The peninsula fails when it gets used as an island. The closed end is not seating; it is the cabinetry that the peninsula bolts to. Trying to put seating on three sides of a peninsula produces an awkward bench that does not really work as either bench or seating, and breaks the work zone behind it.
Open-plan islands need at least 1.0 to 1.2 metres of clear floor on every side.
Open-plan kitchens with an island
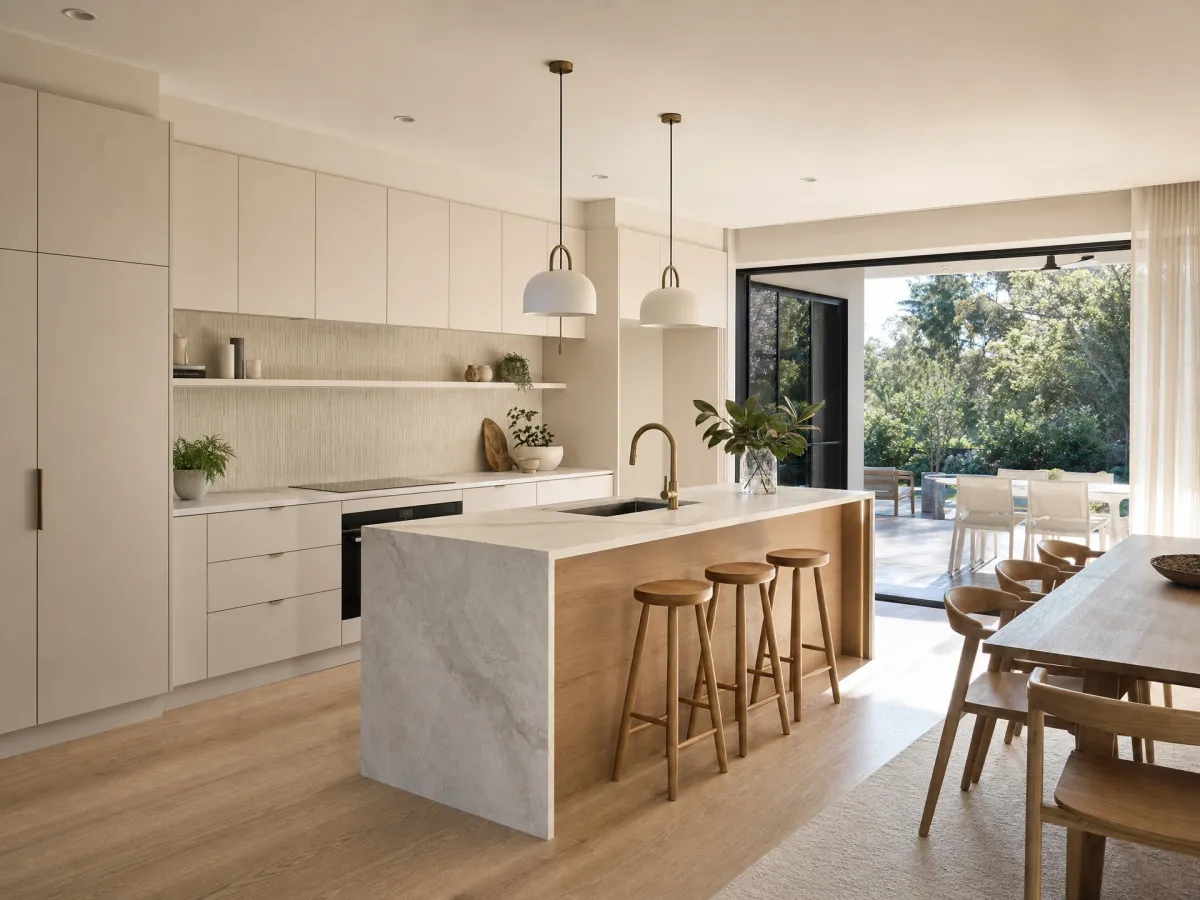
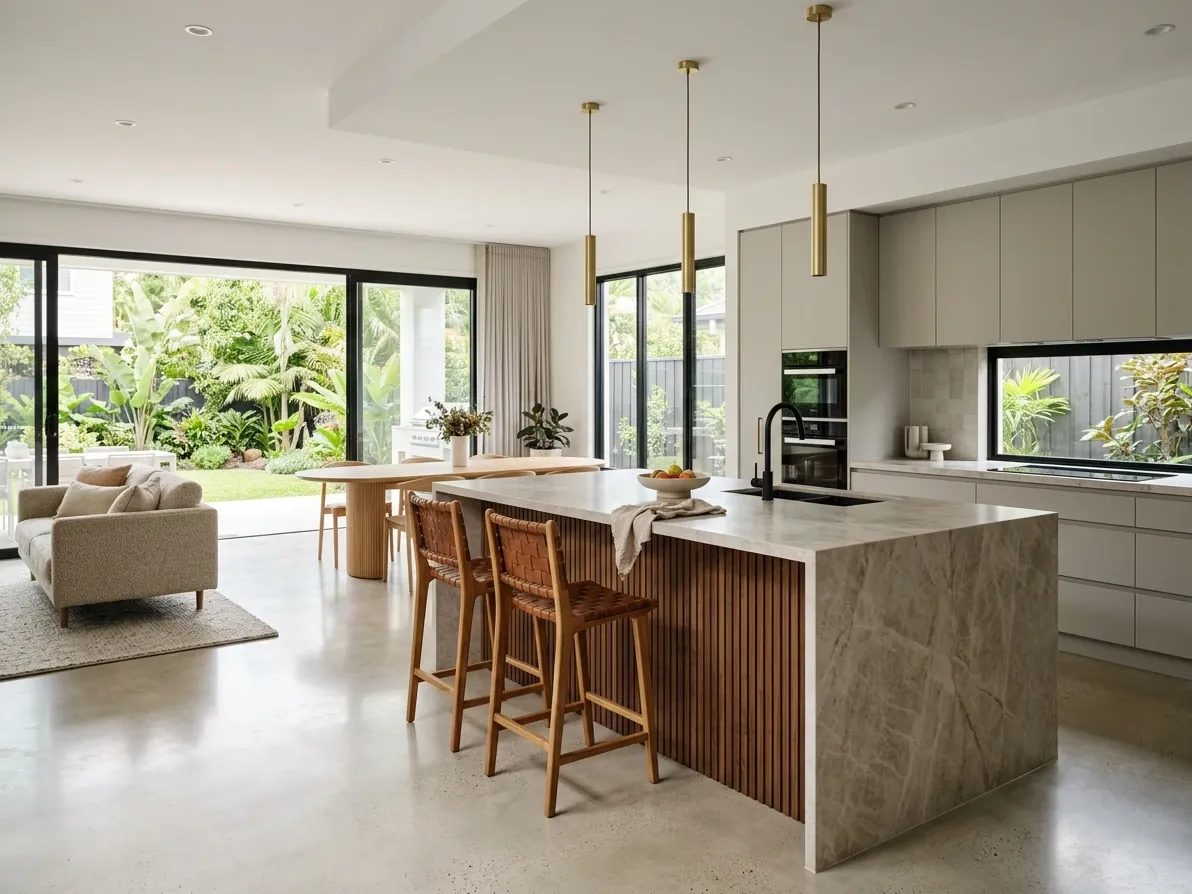
The open-plan kitchen with an island is the default Australian kitchen for any new build above about 180 square metres of internal area, and the most-requested layout in mid- to high-budget renovations. The kitchen sits inside the larger open-plan living, dining and kitchen footprint, with the island defining the boundary between the cooking zone and the rest of the room. The cook faces the room rather than a wall.
The geometry is technically an L-plus-island or a galley-plus-island, but the layout deserves its own treatment because the design problem is different. The kitchen is no longer a service room; it is the social centre of the house. The island has to work as a prep bench, a serving bench, a casual eating bench, a homework bench and an entertaining bench, often all in the same evening. The main run has to work as a kitchen while the island is occupied by people who are not cooking.
The working dimensions are generous. The room needs at least 3.6 metres wall to wall to fit a 600 mm main run, a 1200 mm walkway, a 900 mm island and 900 mm of clear floor on the far side of the island. For a true open-plan island to work properly, plan on 3.6 metres at the narrow end and 4.2 metres or more for comfort. Island length should be at least 2.4 metres for seating on one side, and 3.0 metres or more if the island carries a second sink or cooktop.
The island itself splits into two zones. The cooking-side face holds the prep zone, the storage drawers and any sink or cooktop, with everything oriented to the main run behind. The seating-side face holds the 300 mm overhang for stools, the power points for laptops and chargers, and nothing that needs a working bench depth. The pendant lights hang 750 to 900 mm above the bench, with two pendants for an island under 2.4 metres and three for anything longer.
The open-plan island fails when the room is too small for the geometry. A 3.3-metre-wide room with a forced island leaves 750 mm walkways, an unusable main run, and an island that is permanently in the way. The rule of thumb is to size the room first and let the layout follow, not to size the island first and squeeze the room around it. If the room cannot carry the clearances, the answer is an L-shape or peninsula, not a compressed island.
The open-plan layout also fails when the visual integration with the rest of the room is treated as an afterthought. Because the kitchen is visible from the dining and living zones, every surface that would normally face the cook now faces the room. The bin, the rangehood, the appliance garage, the pantry door, the rubbish recycling system, even the rear of the cooktop, all become visible architectural elements. Open-plan kitchens that work are designed with the view from the sofa in mind, not just the view from the cooktop. This is the single hardest part of designing an open-plan kitchen and the part where a designer earns the fee.
A scullery takes the dirty half of cooking out of the entertaining view.
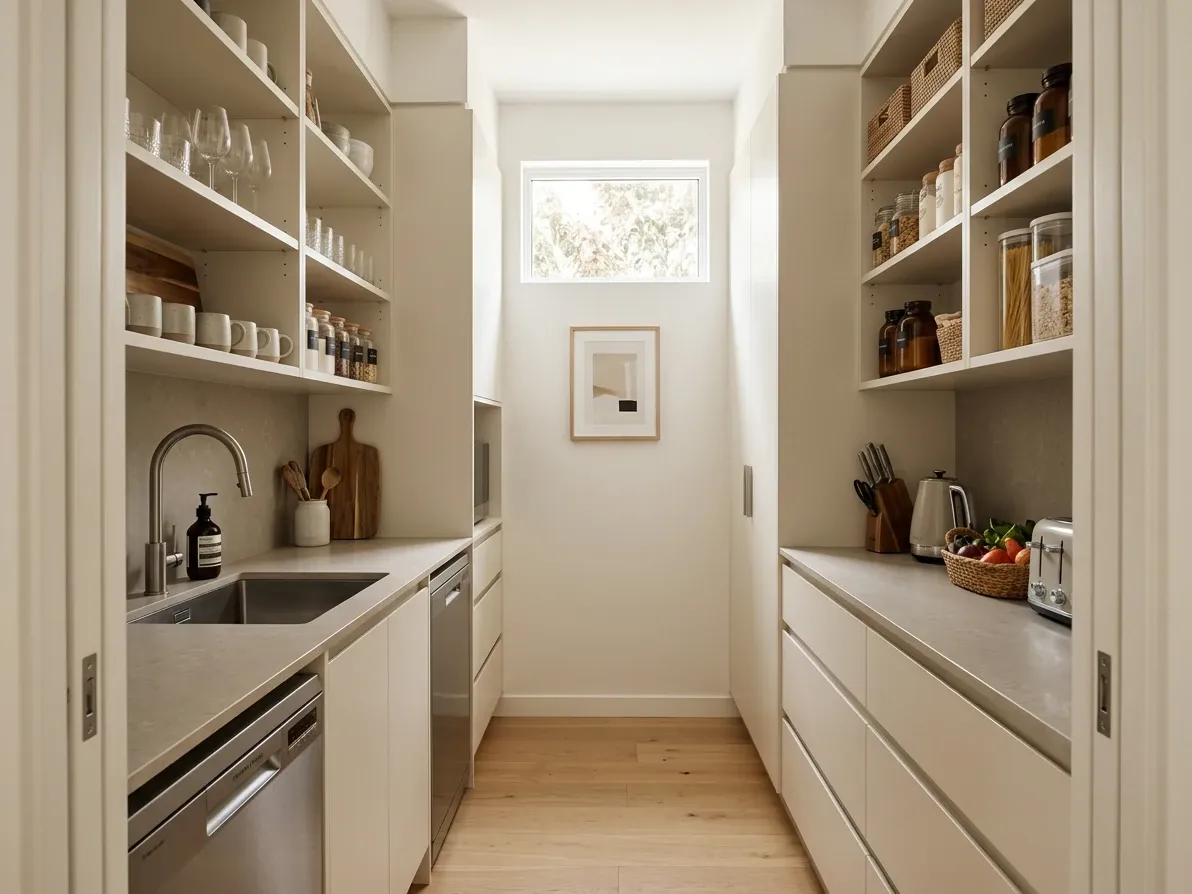
Adding a scullery or butler’s pantry to any layout
The scullery is a small separate room behind or beside the main kitchen that holds the second sink, the dishwasher, most of the bench mess and the pantry storage. The butler’s pantry is the smaller cousin: a walk-in storage room with a benchtop for staging food and small appliances, but typically no second sink. Both have moved from luxury feature to near-default in Australian new builds above about 25 square metres of combined kitchen-and-pantry area.
The driver is the open-plan kitchen. Once the kitchen faces the living room, every dirty dish and every kettle stain becomes part of the room’s visual furniture. The scullery takes the messy half of cooking out of view, leaving the main kitchen clean for entertaining. Most modern Australian builders quote a scullery as a stock option, and most renovators with the floor area available add one.
The working dimensions of a scullery are 1.2 to 1.5 metres wide and 2.4 to 3.0 metres long, with a galley layout inside. One run carries the second sink, dishwasher and bench prep; the opposite run carries open and closed pantry storage. The door from the main kitchen is typically a cavity slider or a flush hinged door painted in the cabinetry colour, and it shuts when guests arrive.
The scullery adds genuine cost: $8,000 to $20,000 above the main kitchen budget, depending on plumbing, electrical and finishes. A walk-in pantry without the second sink runs $3,000 to $8,000 and does perhaps two-thirds of the same job. For renovations where the budget is tight but the floor area is available, the walk-in pantry is usually the better call.
The scullery fails when it gets bolted onto a kitchen that does not have the floor area to support both the main kitchen and the second room. A 6-square-metre kitchen with a 4-square-metre scullery cut out of it has neither a good kitchen nor a good scullery. The decision should be made on the combined floor plan, not on the kitchen alone.
The scullery also fails when it gets used as a storage cupboard rather than a working second kitchen. The whole point is that the dirty work happens in there during entertaining. If the second sink does not get plumbed, the second dishwasher does not get installed, and the bench is too narrow to actually prep on, the scullery becomes a $15,000 walk-in pantry with delusions.
How to choose the layout for your specific room
Five questions decide the layout. Answer them in order.
What is the room width at the narrow end? Below 2.4 metres, you are choosing between single-wall and a tight galley. Between 2.4 and 3.4 metres, the L-shape opens up as the most flexible option. Above 3.4 metres, every layout is on the table. Above 4.0 metres, the open-plan with island starts to become the default rather than the choice.
Where is the existing wet wall and the existing gas point? Whichever wall already carries the sink and dishwasher waste is the cheapest place to keep them. Whichever wall already carries the gas is the cheapest place for the cooktop. Most Australian kitchens were designed around a single wet wall and a single gas point, and keeping both saves $3,000 to $9,000 before any other decision is made. Moving either is a deliberate choice that has to be justified by what it unlocks, not made by default.
How many people cook regularly, and do they cook together? Single cook: triangle layouts are fine, including single-wall, galley, L-shape and small U-shape. Two cooks who work at the same time: zones layout, with L-plus-island or U-plus-prep as the default. Two cooks who alternate: any layout, choose by room shape.
Is the kitchen open to the living area or closed? Closed kitchens can be any layout including U-shape with its back to a wall. Open kitchens push toward L-plus-island, peninsula or full open-plan island, because the U turns the cook’s back to the room. The closed-to-open decision is usually the renovation’s biggest single design choice and has to be made before the layout, not after.
Does the household entertain enough to justify a scullery? This is a floor-area question first and a habit question second. If the combined kitchen-plus-pantry area is below 20 square metres, the scullery probably is not the right call. If the floor area is there and the household entertains six or more people more than once a month, the scullery pays for itself in lived experience even if not in resale. If it does not, a walk-in pantry does the same work for a third of the cost.
The five questions filter most kitchens to one or two viable layouts. If the answer is genuinely ambiguous between two layouts, the deciding factor is almost always cost: which layout keeps the wet wall, which layout works with the existing window, which layout fits the cabinetry budget. The cheaper layout usually wins, because the saved money funds better cabinetry and better finishes inside the layout that wins.
Resolved zones let two cooks work without crossing each other’s paths.
The five most common Australian kitchen layout mistakes
The first is the forced island. The room cannot carry the geometry, but the brief includes an island, so the design squeezes the island in with sub-900 mm walkways and an unusable main run behind. The finished kitchen looks correct in the magazine photo and is exhausting to actually cook in. Fix: if the room is under 3.6 metres wide at the narrow end, take the island out and use a peninsula or an L. The island is not a non-negotiable; the clearances are.
The second is the stretched single-wall. A 4.5-metre clear wall gets a 4.5-metre single-wall kitchen, with the fridge at one end and the cooktop at the other. The cook is walking 3 metres between every step. Fix: anything past 3.6 metres of run should turn the corner into an L. The shorter L arm absorbs the run length into a tighter triangle.
The third is the broken work triangle. The fridge ends up on a separate wall from the sink and cooktop because the fridge had to go somewhere. The cook then crosses the walkway every time the fridge opens, and the walkway is full of someone unloading groceries. Fix: if the triangle is unworkable, the layout is wrong. Move the fridge or move the cooktop, but do not accept a broken triangle and call it a quirk.
The fourth is the two-cook galley. The room is a 1.0-metre-walkway galley, and the household has two cooks who try to share it. Every appliance door closes the walkway. Every cabinet door swings into the cook on the opposite side. Fix: galleys are single-cook layouts. If the household has two regular cooks, the layout is wrong even if the room shape looks like a galley.
The fifth is the bench-light pantry. The pantry takes 1.5 metres of wall length, and the bench between the fridge and the cooktop is now 400 mm. The cook has nowhere to put a chopping board. Fix: every kitchen has to clear 600 mm of clear bench next to the cooktop and 600 mm next to the sink. If the layout cannot do that, the pantry has to move or shrink.
A sixth honourable mention is the open-plan kitchen with the rangehood as an afterthought. The kitchen opens to the living room, the cooktop sits on the island, the rangehood is a 600 mm box hanging from the ceiling in everyone’s eyeline. Either commit to the rangehood as an architectural element and design the lighting and the ceiling around it, or move the cooktop to the main run and let the island be the prep and seating bench. The half-measure of an ugly rangehood floating over a beautiful island is the most common open-plan kitchen mistake on the Houzz Australia 2023 kitchen trends study photographs.
A 3D render shows the layout in the room before any cabinetry is ordered.
Testing the layout before you build
Two-dimensional floor plans hide circulation problems. The plan looks balanced on paper, every cabinet is drawn, every dimension is marked, and then the room gets built and the dishwasher door blocks the walkway. The fix is to test the layout in three dimensions before any cabinetry is ordered.
The traditional answer is the designer’s hand mock-up: tape the layout onto the existing floor, stand inside it, walk through the work triangle, open imaginary cabinet doors, see what bumps into what. It works, and it is free. It is also limited to layouts inside the existing room, with no way to test how the kitchen will look once the rest of the renovation is done.
The modern answer is a 3D floor plan or a photorealistic 3D render. A 3D plan walks you through each layout option as a three-dimensional space before any commitment, and a 3D render shows the finished kitchen at the angle the camera will see it on listing day. Both make circulation problems obvious that hide on a 2D plan, and both are significantly cheaper than rebuilding the kitchen after the fact.
This is where reIMG fits in. The most expensive layout error is not the wrong cabinetry, it is the wrong layout: walls in the wrong places, an island that does not clear, a galley that does not work for two cooks. Seeing the layout visualised in three dimensions in the room, with the cabinetry, the bench heights, the appliance doors and the walkway clearances all in proportion, surfaces the problem before the trades arrive. Send us the room dimensions, the cabinetry intent, and any floor plan you already have; we send back the 3D render that tells you whether the layout actually works for the way you will cook in it.
Frequently asked questions
What is the most popular kitchen layout in Australia?
The open-plan kitchen with an island. It is the default in almost every Australian new build and the most-requested layout in mid- to high-budget renovations. The island does the work of a third wall in a U-shape, but in an open room rather than a closed one, which is why it has become the layout people picture when they say the word kitchen. The catch is that it only works properly above about 14 to 16 square metres of room area, and it needs at least 1.0 to 1.2 metres of clear floor on every side of the island. In smaller rooms the L-shape and the galley are more honest layouts than a forced island.
What’s the smallest kitchen layout that actually works?
A single-wall kitchen on a clear wall of at least 3.0 to 3.6 metres. That gives you a 600 mm fridge, a 900 mm sink and dishwasher run, a 600 mm prep zone and a 600 mm cooktop run, with the oven below. It is the layout used in almost every Australian one- or two-bedroom apartment and it works well there. Below 3.0 metres you are choosing what to leave out, usually the dishwasher. The galley layout starts to work at a room width of about 2.2 metres and a length of 2.7 metres, but only if you can afford the second plumbing wall.
How wide does a kitchen need to be for an island?
About 3.6 to 4.0 metres wall to wall, minimum. An island bench is typically 900 mm deep. The recommended clearance between the island and the opposing run is 1000 to 1200 mm, with 900 mm being the absolute floor. A 600 mm main run plus 900 mm island plus 1200 mm clearance comes to 2.7 metres of room width, plus another 900 mm on the far side of the island if there is a second run there. For a true open-plan island to work, plan on 3.6 metres at the narrow end and 4.2 metres or more for comfort.
What’s the kitchen work triangle, and is it still relevant?
The work triangle joins the three points the cook moves between most: the fridge, the sink and the cooktop. The convention is that each leg of the triangle sits between 1.2 and 2.7 metres, the three legs sum to between 4.0 and 7.9 metres, and no full-height obstacle intrudes more than 300 mm into any leg. It is still useful for single-cook kitchens. For larger open-plan kitchens with two cooks and a separate prep area, the five-zone framework (consumables, non-consumables, cleaning, preparation, cooking) is more honest because it accepts that one cook is at the cooktop while another is at the island prepping. Use the triangle for compact layouts and the zones for everything bigger.
How much extra does it cost to change the kitchen layout?
Moving the sink, cooktop or fridge to a new wall typically adds $3,000 to $9,000 in plumbing, gas and electrical relocation, plus patching and re-tiling, before any cabinetry change. The single biggest cost lever in a kitchen renovation is whether you keep the existing layout or move the wet points. Keeping the layout and upgrading cabinetry, benchtop, splashback and appliances usually costs 20 to 30 per cent less than a relocated layout for an equivalent finish. If the budget is tight, the answer is almost always to keep the existing wet wall and spend the money on the visible finishes.
Do I need a scullery or butler’s pantry?
Only if the main kitchen is open to the living area and you genuinely entertain. The scullery, a separate small room behind the kitchen with the second sink, dishwasher and most of the bench mess, has become a near-default in Australian builds above about 25 square metres of combined kitchen and pantry area. It is also a common addition to open-plan renovations where the main island faces a living room. In smaller homes a walk-in pantry without the second sink does most of the same job for a third of the cost. The decision should be made by floor area and entertaining habits, not by trend.
Which kitchen layout is cheapest to build?
Single-wall, by a long way. There is only one plumbing wall, one electrical run and one set of overhead cabinets. A flat-pack single-wall kitchen in a small apartment can be installed for under $10,000 including appliances. Galley is next, because the second run can often share services with the first. L-shape sits in the middle. U-shape and any island layout sit at the top because every island adds a plumbing, gas and power run under the slab or floor, plus the island cabinetry itself. The cost gap between a single-wall and an open-plan kitchen with island is rarely under $20,000 like for like.
Can I plan a kitchen layout myself or do I need a designer?
You can plan a layout yourself if the kitchen is single-wall, galley or L-shape inside an existing room with the plumbing staying put. The work is measuring, choosing cabinetry from a flat-pack catalogue and getting a licensed plumber, electrician and gas fitter for the connections. For U-shape, peninsula, any island layout or anything that moves a wall, a kitchen designer or building designer is worth the fee, which typically runs $1,000 to $3,500 for a documented design. The cost of a wrong layout decision is significantly higher than the design fee, and the designer also coordinates the trades.