Kitchen renovations without blowing the budget
What an Australian kitchen reno actually costs in 2026, where the money goes, and the 12 things that decide whether you land on budget or blow it by 30%.
What this guide is, and what it isn’t
If you’ve landed here, you’re probably staring at a tired kitchen, a number you’d quietly like to spend, and a creeping suspicion that the number isn’t enough.
This is the budget reality check. It covers what an Australian kitchen renovation actually costs in 2026, where the money goes, why most kitchens that blow the budget blow it for the same handful of reasons, and the twelve decisions that decide whether you land on budget or 30% over.
It is not a sales piece for any particular brand or trade. We run a render service for builders, agents and designers, and we’ll mention it once where it’s genuinely relevant. The rest is just what we’d tell a friend planning their first reno.
What does a kitchen renovation actually cost in Australia in 2026?
Let’s get the headline numbers out of the way. These are realistic 2026 ranges for a typical 10–15 m² Australian kitchen, including GST, sourced from HIA, hipages, Houzz Australia and the cost guides published by mainstream Australian renovation builders.
| Tier | Total budget (AUD inc. GST) | What you’re getting |
|---|---|---|
| Cosmetic refresh | $8,000–$22,000 | Repaint or reface cabinets, new handles, paint or laminate benchtop, new tapware, peel-and-stick or painted splashback. Same layout, no plumbing or electrical changes. |
| Budget renovation | $15,000–$25,000 | Flat-pack cabinets (Kaboodle, IKEA, Kinsman Xpress), laminate or porcelain benchtop, basic appliance package, tiled splashback. Same layout. |
| Mid-range renovation | $25,000–$45,000 | Semi-custom cabinetry, stone or porcelain benchtop, mid-range appliances, new splashback, minor electrical and plumbing reroutes. The most common spend by a wide margin. |
| Premium renovation | $45,000–$80,000 | Full custom joinery, premium stone or porcelain, integrated appliances, butler’s pantry, layout changes. |
| Luxury | $80,000–$150,000+ | Bespoke joinery, marble or quartzite, European appliances, structural changes, designer involvement. |
The HIA national median for a kitchen renovation sits in the $30,000–$35,000 range, which is right in the middle of the mid-range tier. If you’re aiming below that, you’re going to be making some real choices about where to spend.
A useful gut-check from the HIA: a sensible kitchen renovation budget runs around 5–8% of the value of your home. On a $750,000 home, that’s $37,500 to $60,000. On a $1.2 million Sydney home, $60,000 to $96,000. Above that and you’re risking over-capitalising for the suburb. Below it and you might be under-spending on the room that does the most work to recover its cost at sale.
Sydney and Melbourne uplift. Add roughly 10–20% to all of the figures above if you’re in metro Sydney or Melbourne. Labour rates are higher, delivery and disposal cost more, and skilled trades book out further. Brisbane and Perth sit closer to the national average. Regional pricing is usually below the national median but lead times are often longer.
Per square metre quick-look. Budget kitchens land around $1,500–$2,000/m² of kitchen area. Mid-range $2,500–$3,500/m². Premium and luxury push past $4,000/m². Useful when you’re sanity-checking a quote.
Where does your money actually go?
This is the breakdown that almost no homeowner sees until the quote arrives. Memorise it. It explains every conversation you’ll have with a kitchen designer or builder.
For a typical $35,000 mid-range kitchen renovation:
- Cabinetry: 30–45% ($10,500–$15,750). Always the biggest single line. Custom is roughly double the price of flat-pack.
- Benchtops: 10–15% ($3,500–$5,250). Stone, porcelain slab and timber are at the top end; laminate is at the bottom.
- Appliances: 10–20% ($3,500–$7,000). Where a lot of budgets quietly inflate. The difference between a Bosch package and a Miele package is $5,000–$15,000.
- Trades and installation: 20–35% ($7,000–$12,250). Plumber, electrician, tiler, carpenter, splashback installer. More if you’re moving plumbing or upgrading the switchboard.
- Splashback, tapware, hardware, lighting: 5–10% ($1,750–$3,500).
- Permits, skip hire, disposal, waste: 2–5% ($700–$1,750).
Two things to notice. First, cabinetry plus trades is more than half the budget on every kitchen, which is why the easiest budget move is keeping the existing layout. You’re paying for cabinets you’d buy anyway and trades who’d install them anyway. The moment you move the sink to the other side of the room, you add a plumber day, an electrician day, sometimes a tiler return visit, and your cabinetry layout changes too. A $3,000 layout change can quietly become a $7,000 layout change.
Second, appliances are the single most controllable line. A $20,000 appliance package can do everything a $5,000 package does in a renovation visible from your couch. The cooktop boils water at the same speed.
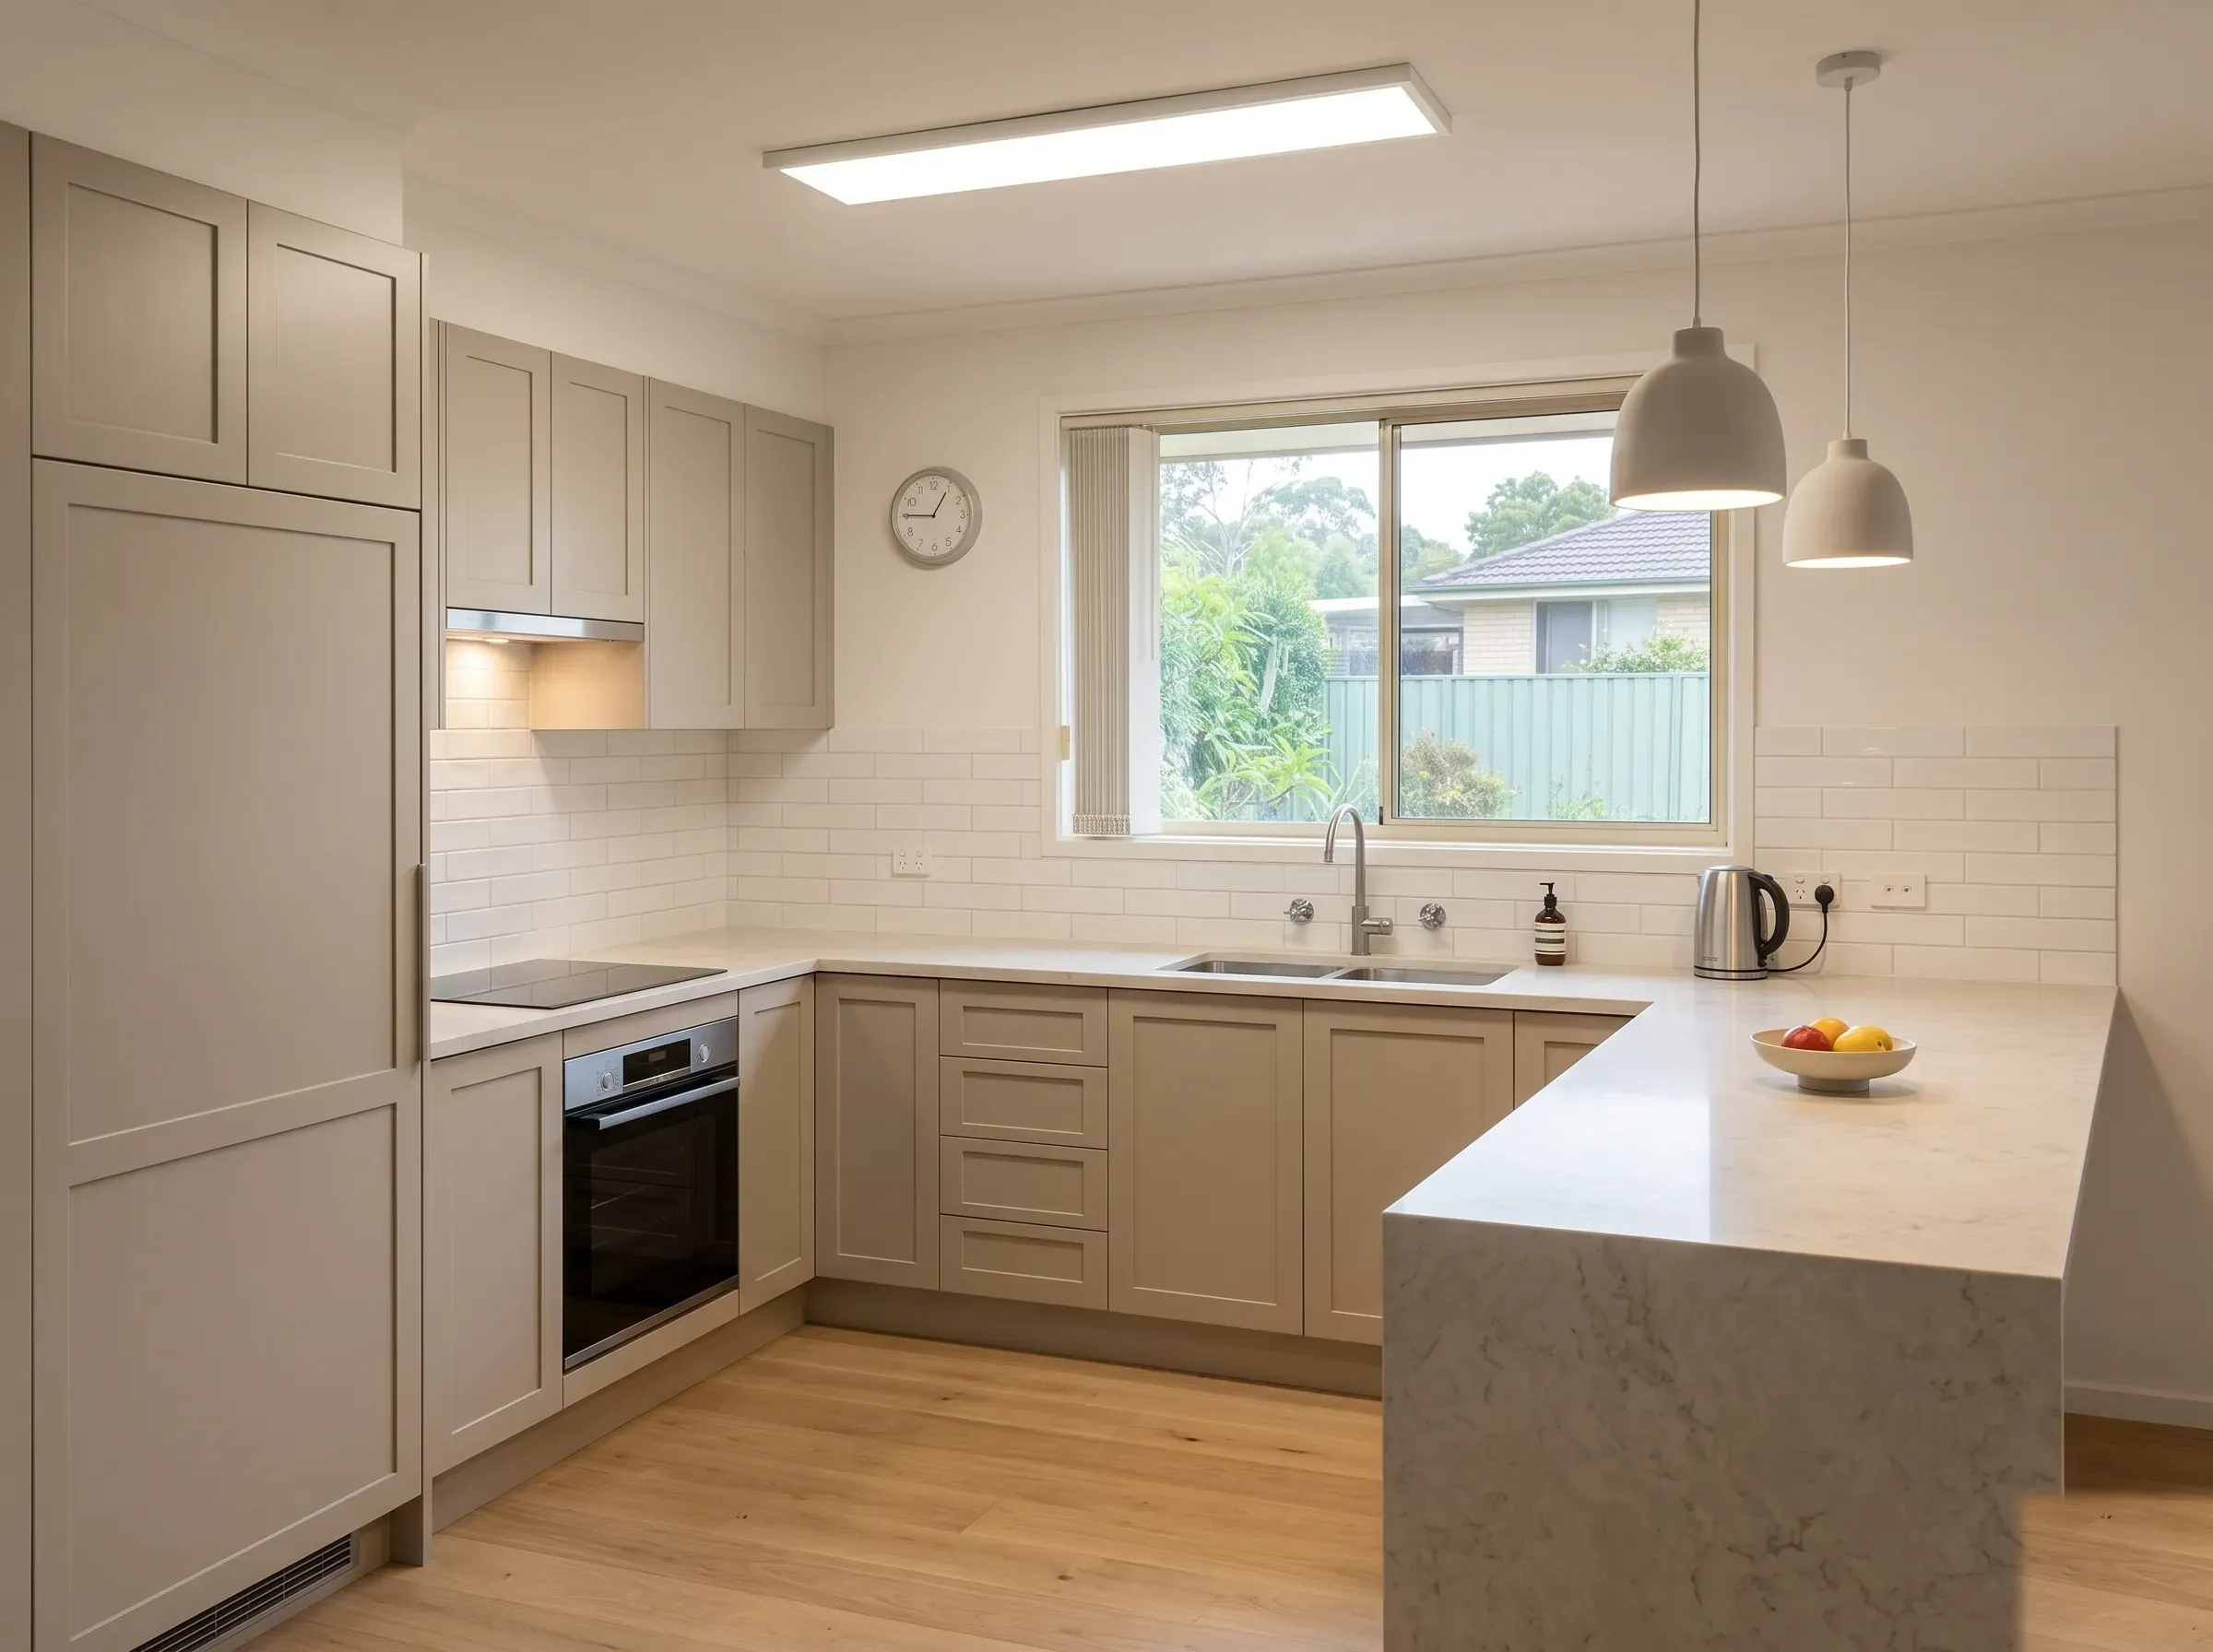
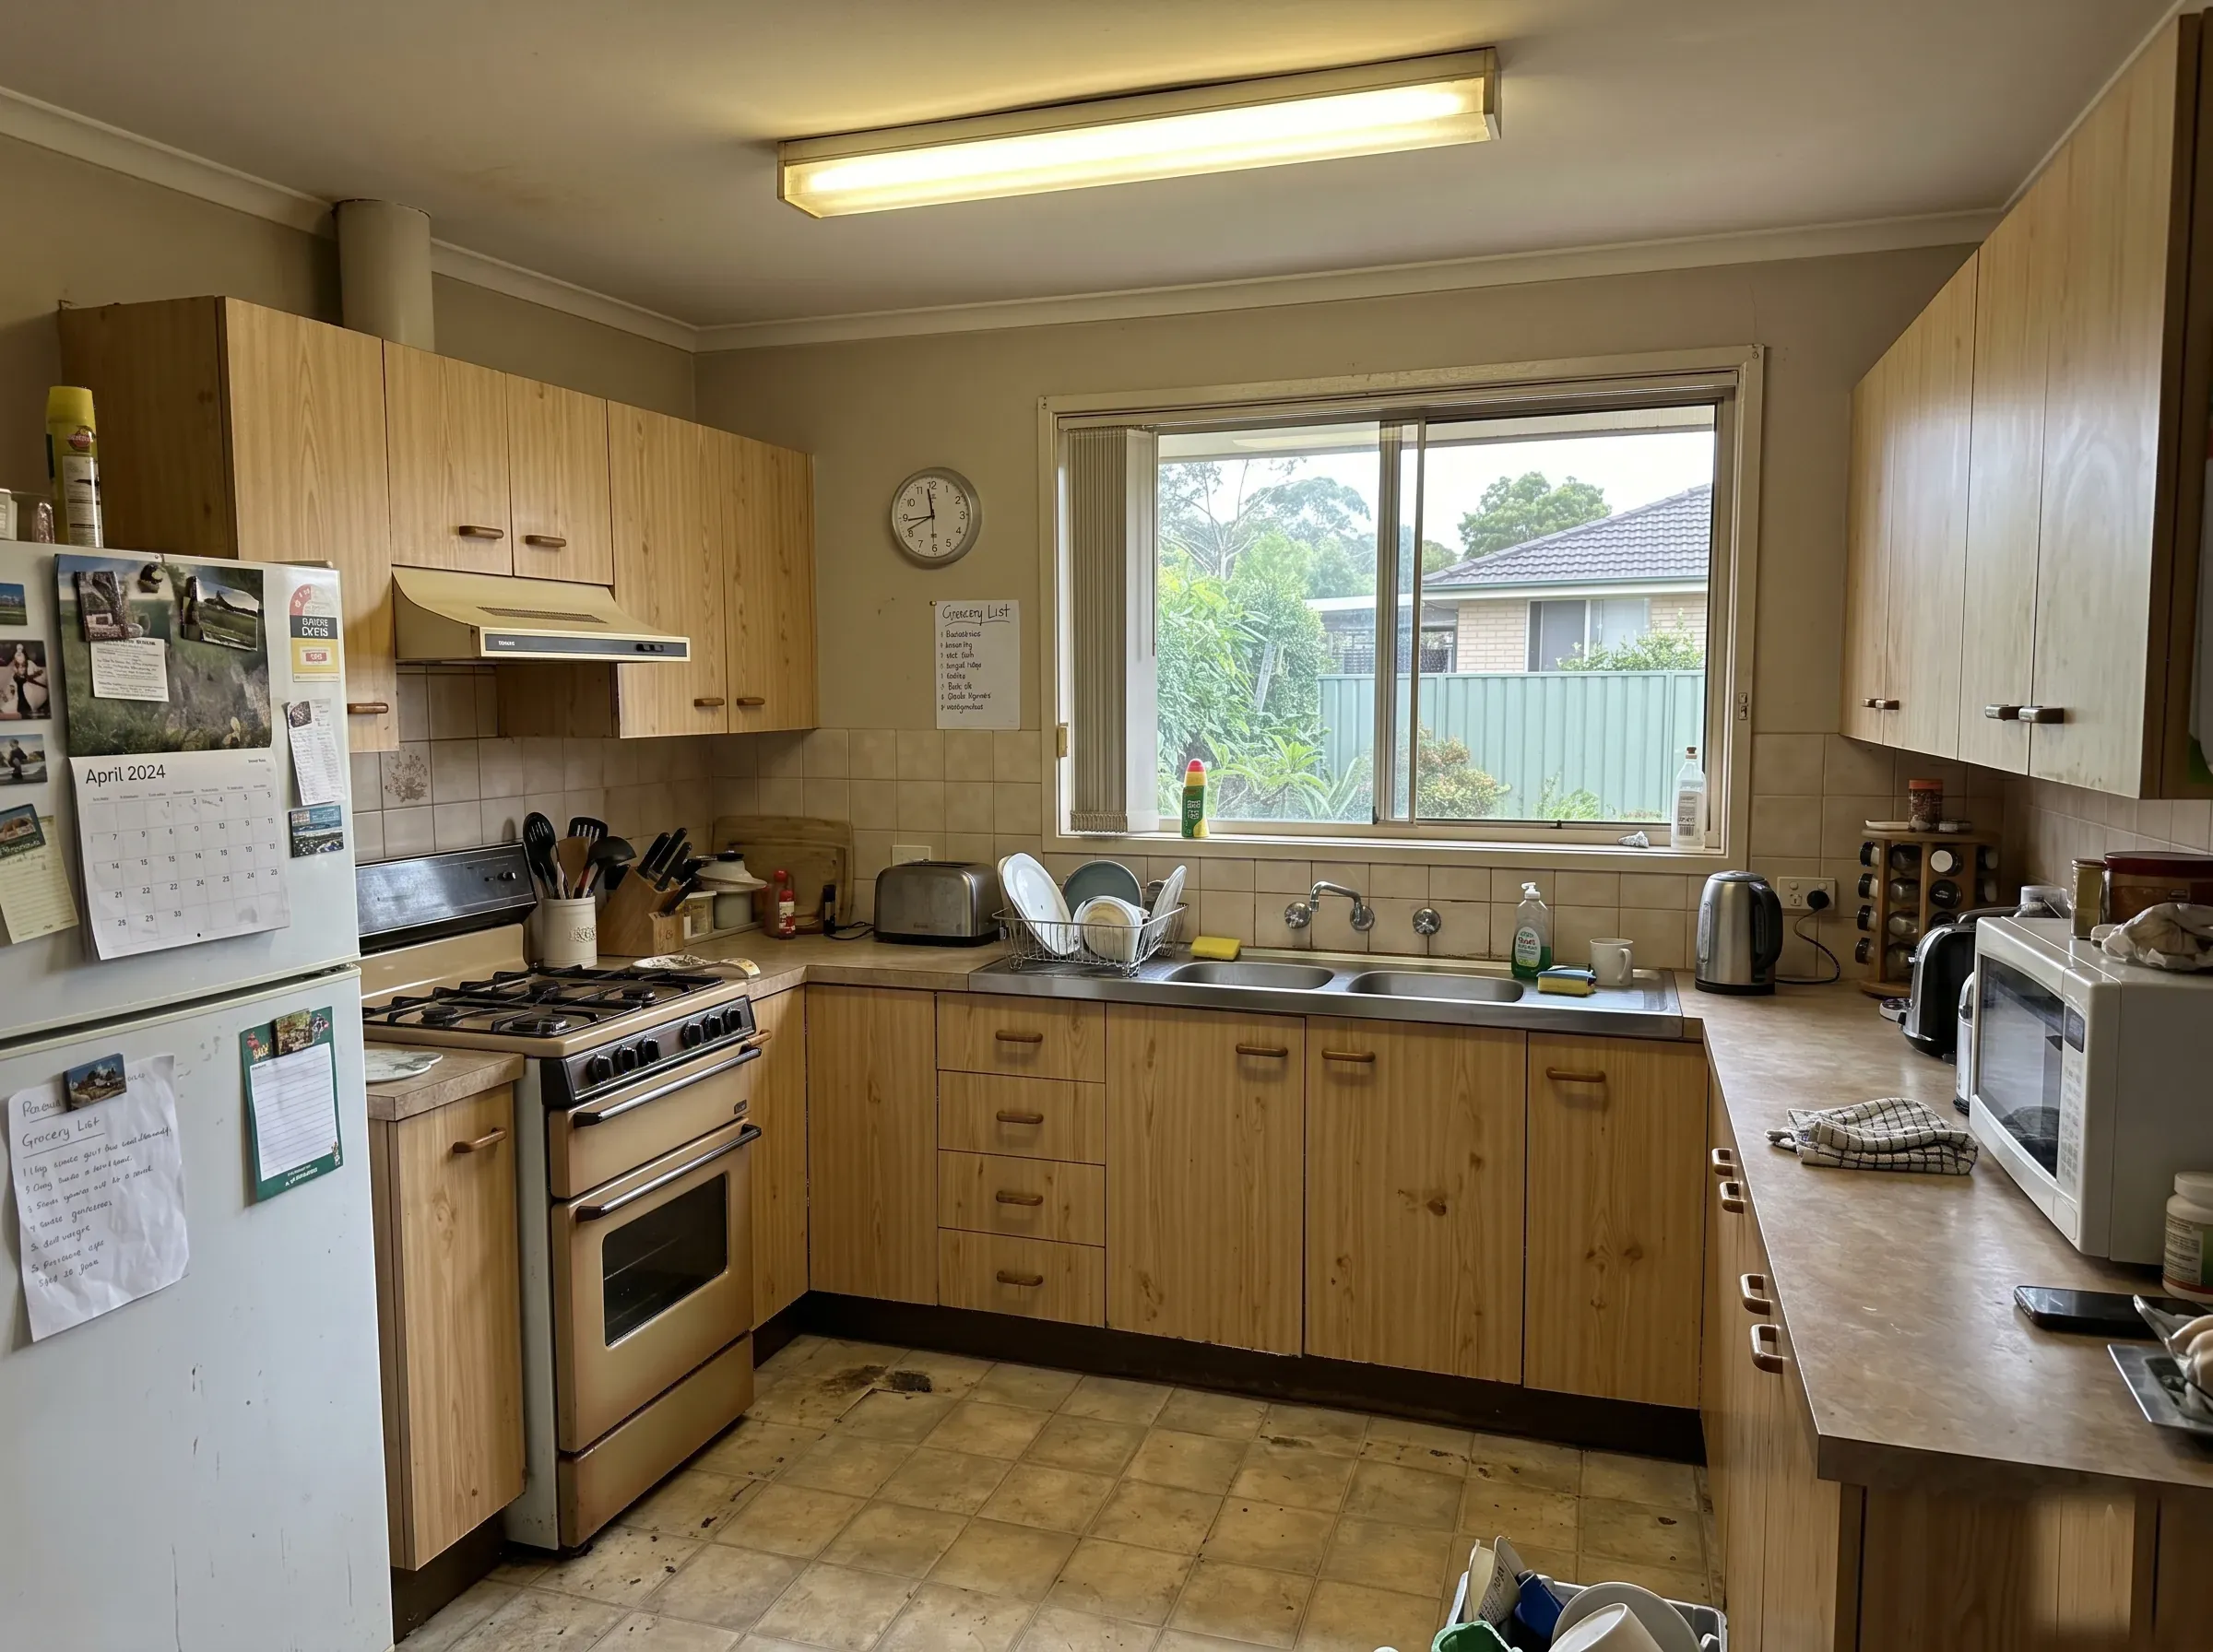 Before
After
Before
After
12 ways to actually keep your kitchen renovation on budget
Most “budget tips” articles give you a list of materials to swap. That’s useful but it’s not where most kitchens go off the rails. Here’s what actually moves the needle, in rough order of impact.
1. Set your total budget with the contingency baked in
If you have $35,000 to spend, your job budget is $30,000 and your contingency is $5,000, held in a separate column, treated as untouchable until something genuinely unexpected happens. A 15% contingency is the minimum for a 1990s-or-later home; 20–25% if you’re renovating anything pre-1980 or you suspect asbestos.
The mistake is treating contingency as “extra money if I want it.” Inevitably, the wood-look tile catches your eye at week three and the contingency disappears into upgraded selections, leaving nothing for the actual surprise when the plumber finds copper pipes that should have been replaced a decade ago.
2. Keep your existing layout
If you take nothing else from this guide, take this. Every Australian kitchen designer, builder and reno-builder agrees on the single biggest cost amplifier: moving plumbing, gas, or the electrical switchboard.
A like-for-like layout means the plumber spends a few hours on the day, not three days across two visits. The sparkie does a refresh, not a rewire. The tiler doesn’t have to patch and re-waterproof. You can do a top-to-bottom renovation of your existing footprint for a third of what a rearranged kitchen costs.
The trade-off is that you’re stuck with the layout you have. If it doesn’t work, it’s worth knowing what it costs to fix, but go in with eyes open.
3. Reface or repaint the cabinets if the carcasses are sound
Cabinet boxes (the carcasses) often outlast the doors and benchtops. If yours are in good shape (square, not water-damaged, not chipboard that’s swelled at the kicks), you can paint or replace just the doors and handles for a fraction of the cost of new cabinetry. Cherie Barber’s much-discussed $9,860 kitchen overhaul is the canonical Australian example: kept the cabinets, replaced the doors, painted the benchtop, vinyl plank floor.
This won’t work in every case, but when it does, it can take $10,000–$15,000 off the cabinetry line.
4. Choose flat-pack or semi-custom over full custom
Unless your space is genuinely non-standard (sloped walls, awkward angles, ceiling heights below 2.4 m), flat-pack systems from Kaboodle, IKEA and Kinsman Xpress, or semi-custom from local cabinet makers, will deliver 90% of the look of full custom for half the price. The difference between flat-pack and custom on a typical kitchen is $5,000–$10,000.
Where custom is worth it: a kitchen island over 2.4 m, a butler’s pantry with integrated appliances, a pantry door that runs floor-to-ceiling on a non-standard height. Otherwise, you’re paying for flexibility you won’t use.
5. Pick laminate or porcelain over engineered stone
The engineered stone ban (Safe Work Australia, in effect from 1 July 2024) has changed the benchtop conversation entirely. Engineered stone, the dominant benchtop material in Australia for the last decade, is no longer manufactured, supplied or installed.
The replacements are porcelain slab, sintered stone, natural stone, laminate and timber. Porcelain has emerged as the mid-range default and is genuinely excellent: durable, heat-resistant, photo-realistic stone-look surfaces. Expect to pay 10–20% more than the old engineered stone price. Laminate has come a long way too and is the cheapest by a wide margin. Natural stone (marble, granite) is more expensive again but no longer at as much of a premium relative to porcelain.
Choose by use case. If you bake a lot, porcelain or stone. If the kitchen is mostly cosmetic, laminate is fine.
6. Mix high and low
The advice you’ll hear from every kitchen designer is the same: pick one or two things to splurge on, and go cheap everywhere else. Tapware and the sink are the two best places to splurge. You touch them every day, they’re visible, and the price difference between cheap and good is genuinely felt.
Splashback tile is the best place to save. Subway tile is timeless. Most of the eye-catching tile choices that make Pinterest are also the choices people regret three years in.
7. Do the demolition yourself
If you’re physically up for it, demo day is a free thousand dollars. Pulling out old cabinets, ripping up old flooring, removing the splashback: none of it requires a license. A skip bin and a long Saturday saves the demo trade fee. Just don’t touch anything load-bearing, and don’t disconnect plumbing or electrical yourself unless you’re licensed.
8. Buy appliances at end-of-financial-year sales
The June and July window is the single best time to buy appliances in Australia. Good Guys, Harvey Norman, Appliances Online, Bing Lee: every major retailer runs deeper discounts than at any other point in the year. Bundle deals (cooktop, oven, rangehood, dishwasher) save another 10–20% on top.
If your renovation timing is flexible, time the appliance order around June. If it’s not, at least check the bundle pricing. Most kitchen companies don’t include appliances in their quote and you can save thousands buying them yourself.
9. Get three itemised quotes, never lump-sum
This is non-negotiable. A lump-sum quote that says “supply and install kitchen: $42,000” is a cost-control disaster. You can’t compare it to anything, you don’t know what’s included, and every variation becomes a negotiation.
An itemised quote breaks out cabinetry, benchtops, appliances (if included), each trade, demolition, disposal, GST and a stated contingency line. If a builder won’t itemise, that’s information.
Three quotes is the minimum. Less than three and you have no benchmark. More than five and you’re wasting everyone’s time.
10. Verify your tradie’s licence before paying a deposit
Every state has a free public licence checker. NSW Fair Trading, Victorian Building Authority, Queensland Building and Construction Commission, Consumer and Business Services SA, Building and Energy WA. Two minutes online tells you whether the person you’re about to write a $5,000 cheque to is actually licensed for the work, and whether they have any complaints or insurance claims against them.
NSW caps deposits at 10% of the contract price for residential building work over $20,000. Other states have similar rules. If a builder asks for 30% upfront, that’s a red flag, not a negotiation point.
11. Lock every selection before the contract is signed
This is its own H2 below because it’s the single highest-impact decision in your entire renovation. Read it before you sign anything.
12. See the design before you commit to it
You can’t approve what you can’t picture. If your kitchen is a mood board on Pinterest, a Word doc of cabinet codes, and a verbal description of “matt black handles, nothing too shiny”, there’s a real chance the finished room won’t match what’s in your head. That’s not a small problem. That’s where mid-build variations come from, and mid-build variations are where budgets die.
We’ll come back to this in detail.
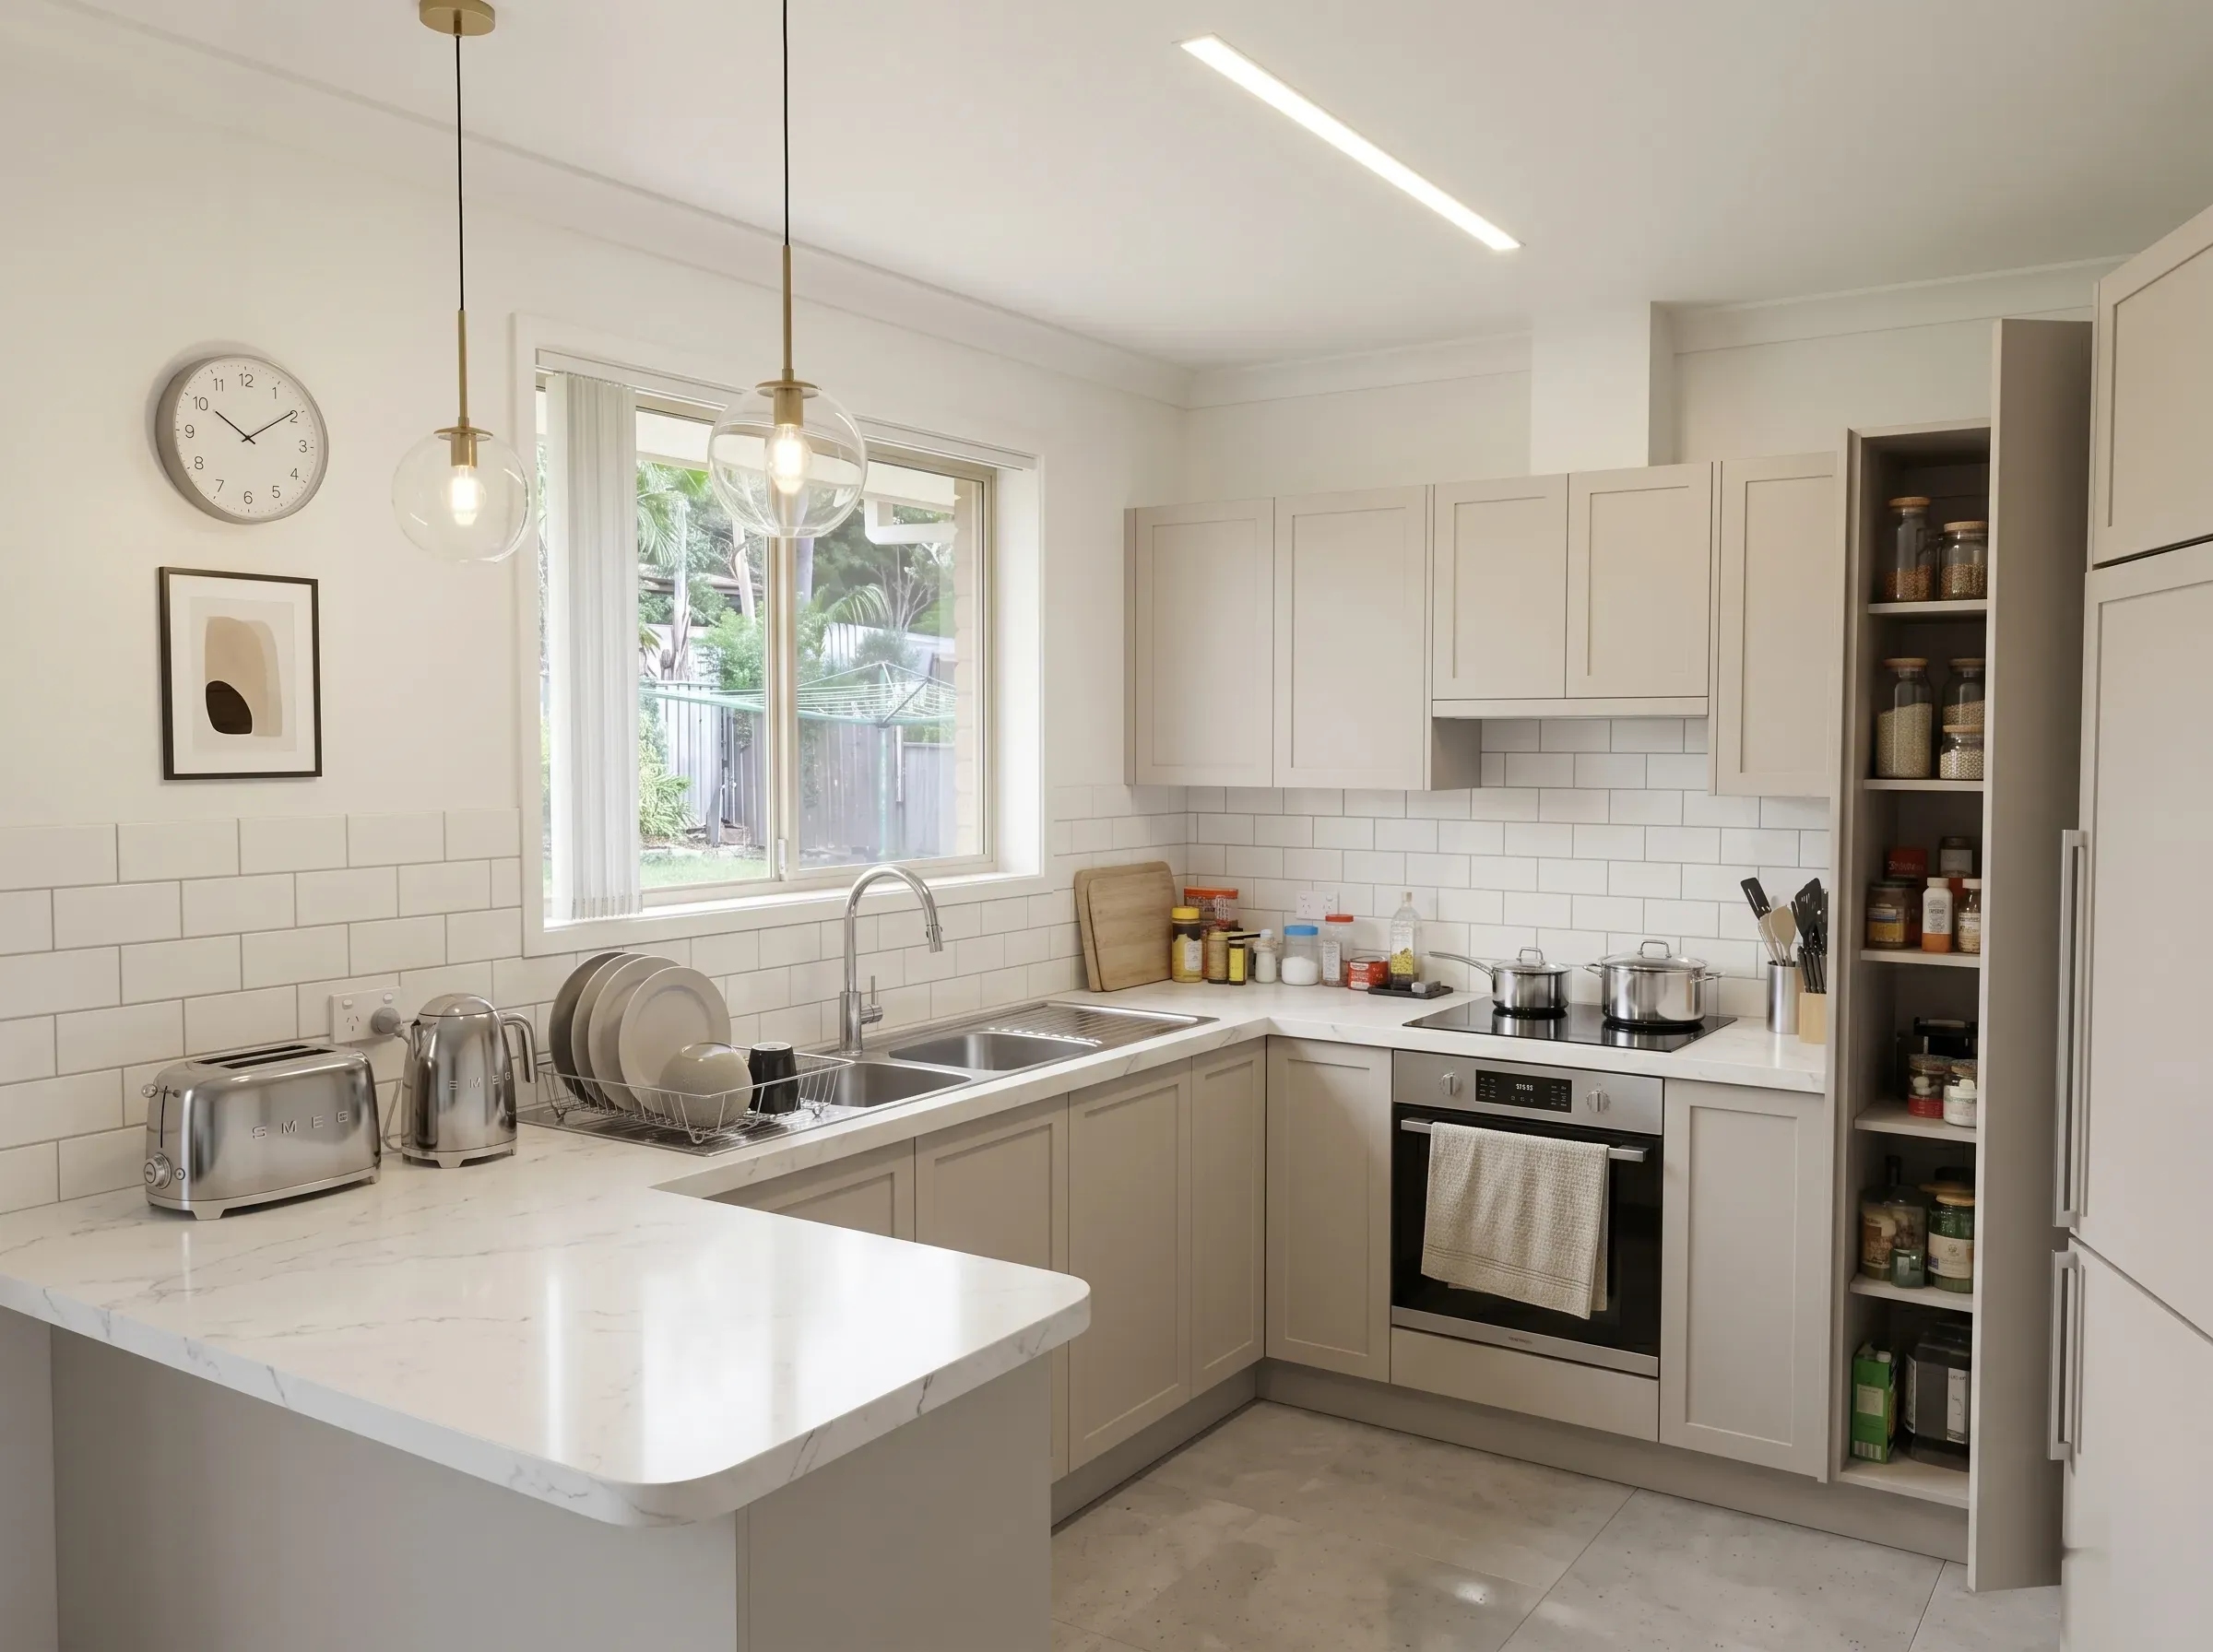
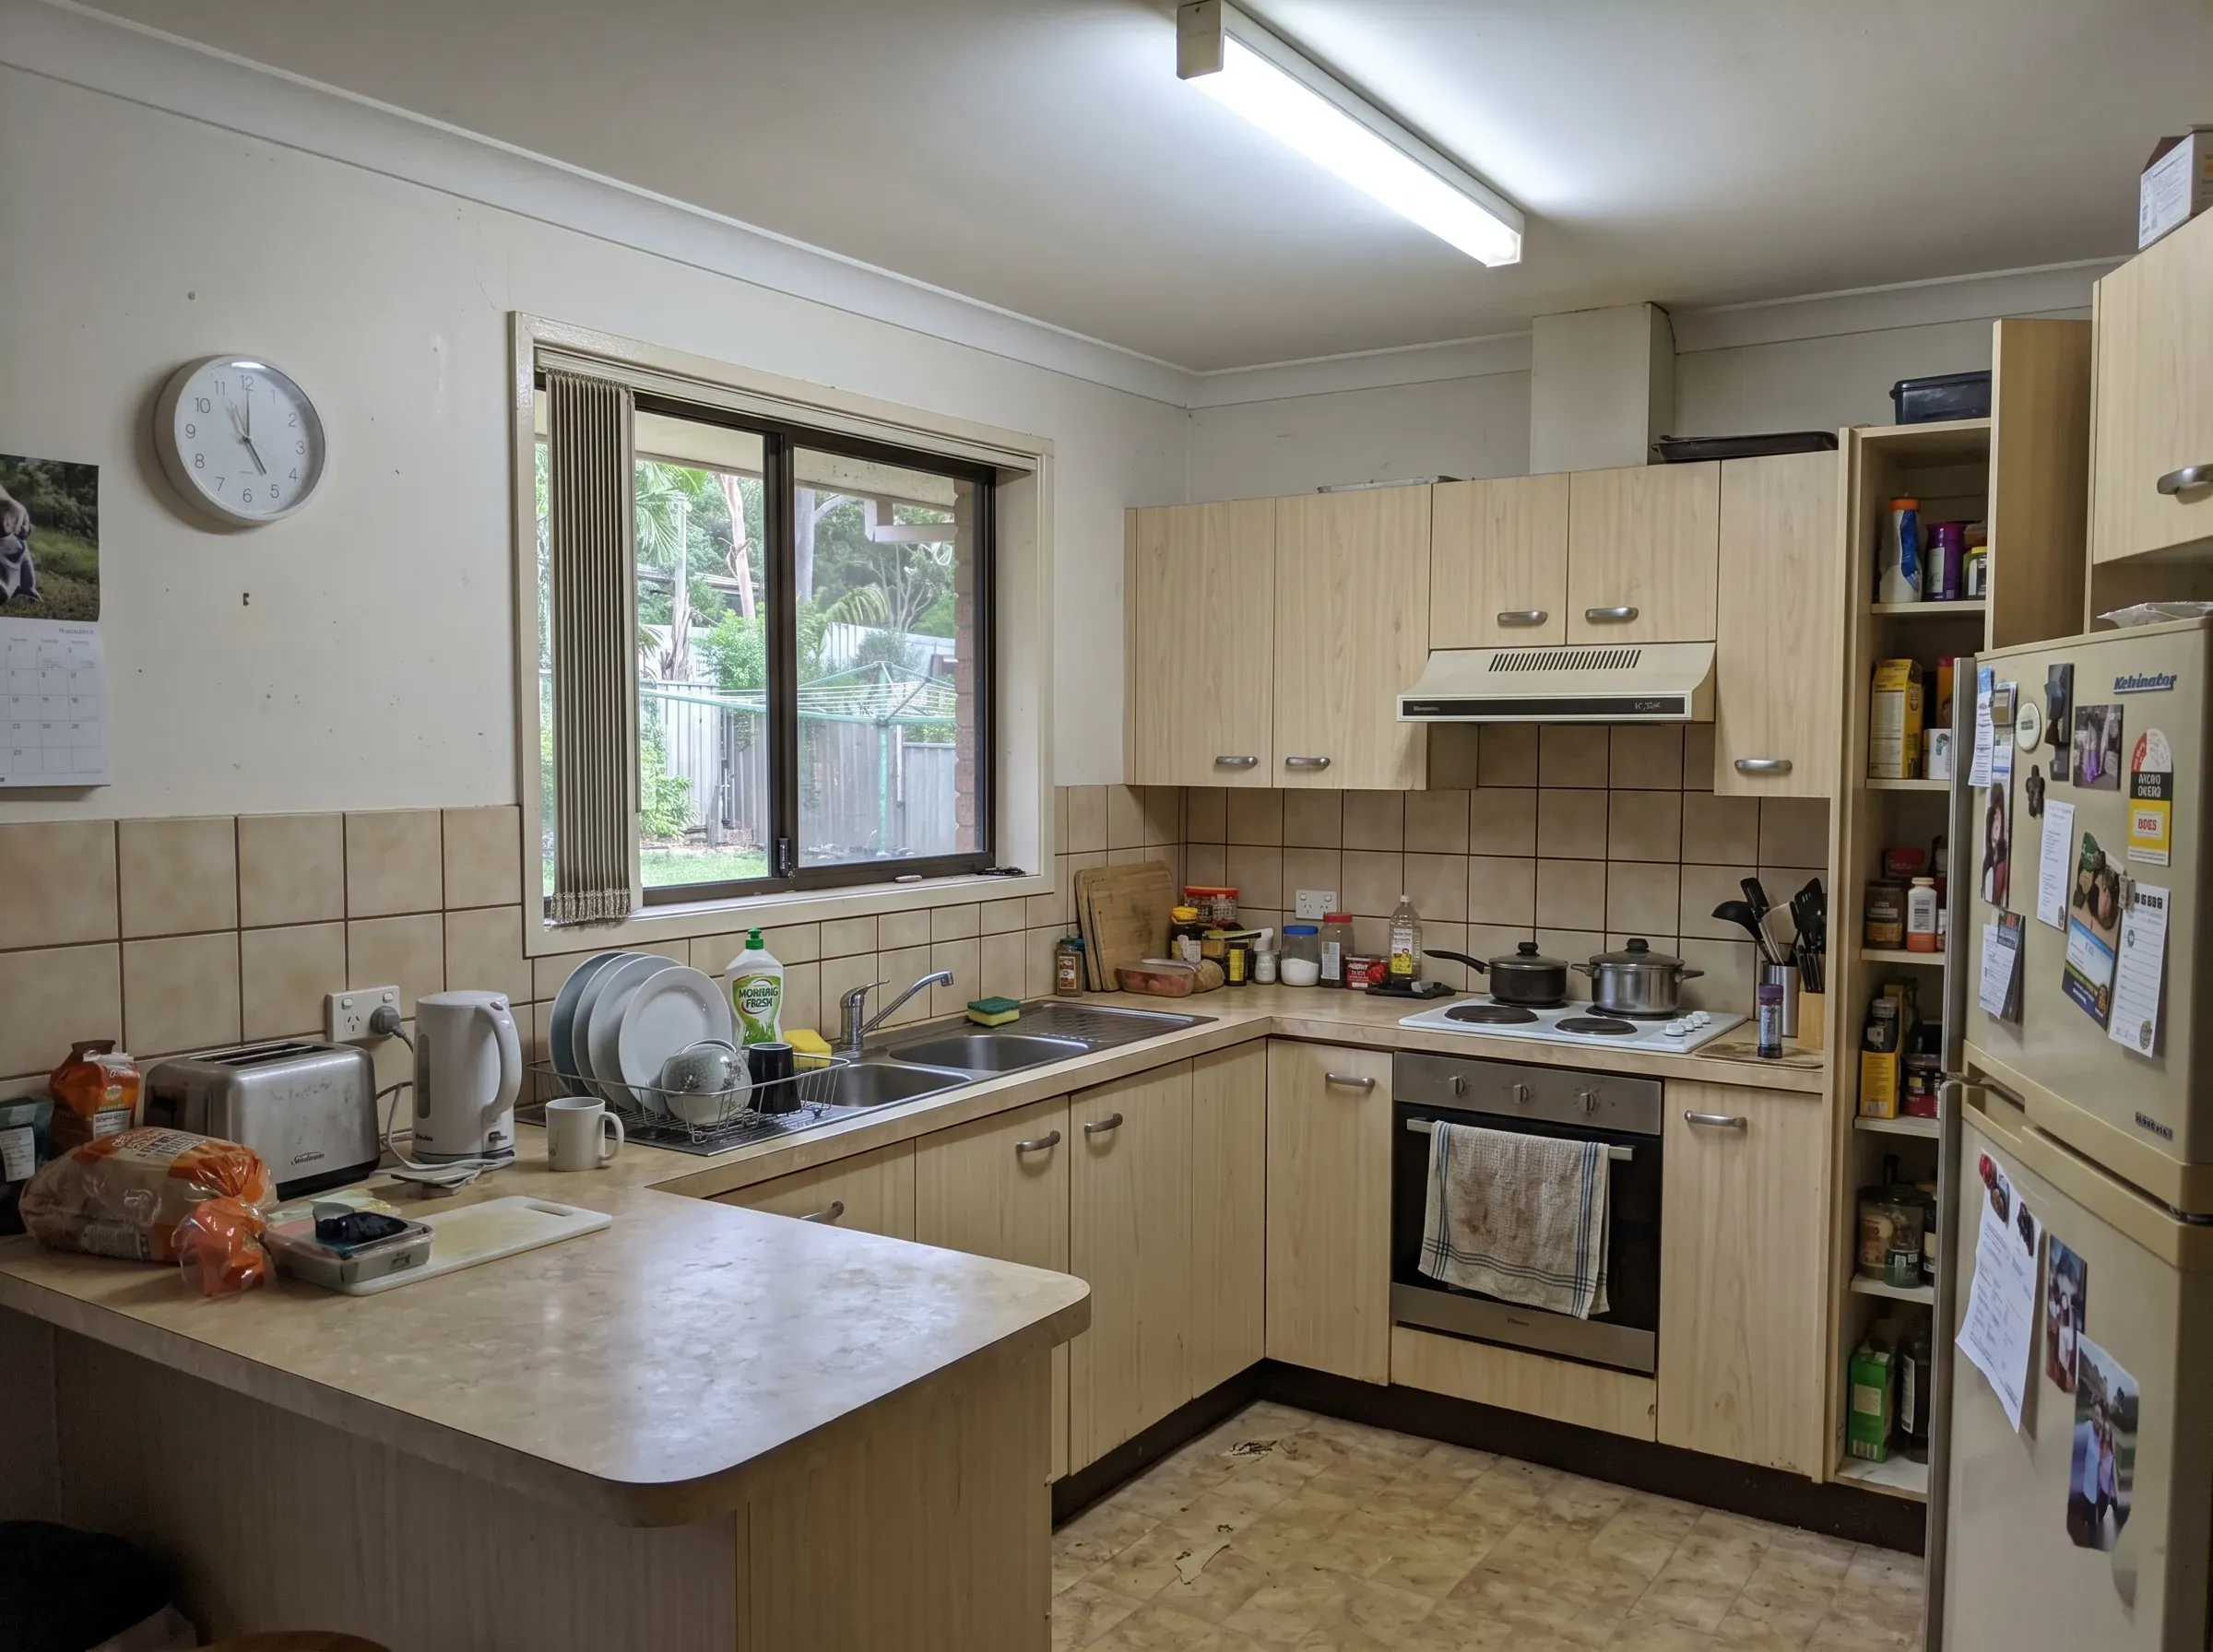 Before
After
Before
After
Lock it before you sign: why mid-build changes are the #1 reason kitchens blow the budget
Australian builders, the HIA, and every state regulator agree on the same point. NSW Fair Trading puts it most plainly in its official guidance on residential building contracts: be confident before you sign that you’ve thought of everything, because changing something later can blow out your budget.
Here’s the mechanism. Once you sign a fixed-price contract, every change to the agreed scope becomes a “variation”. Variations are charged at the builder’s margin (typically 10–20%) plus GST, plus the cost of the new work, plus any rework needed because the trades are already past the point you’re trying to change. When the tiler is already on site, a simple “actually, can we change the splashback tile to that other one I saw?” is rarely a $200 conversation.
Houzz’s 2026 House and Home Study, which surveyed more than 20,000 homeowners across Australia, the US and the UK, found that 37% of renovating homeowners exceeded their planned project spend; only 3% came in under. The five most common causes of the overrun were higher-than-expected costs, more expensive material choices than originally planned, project complexity, scope or design changes, and unexpected construction issues. Two of those five (material upgrades and design changes) are vision-and-reality mismatches that show up after the contract is signed.
The advice from every Australian renovation builder converges on the same line. Lock the layout before you quote. Lock the selections before you sign. Variations are not the place where you discover what you actually want.
The reason this is so hard in practice is that homeowners are asked to commit, in writing, to choices they cannot easily picture. A 10 cm × 10 cm tile sample sitting on a kitchen bench under fluorescent showroom lighting is not the same thing as 8 m² of that tile on your splashback at 5 pm in your actual kitchen. A digital colour swatch of a cabinet door is not the same thing as that door, in that volume, next to that benchtop, under your kitchen window.
The signature trap is the matt finish. Matt black cabinets with a black stone benchtop is one of the most-Googled kitchen styles in Australia. It’s also the single most-regretted finish choice on r/AusRenovation, where homeowners describe every fingerprint, every water mark, every smear of cooking oil being permanently visible. Most of those homeowners didn’t pick that combination because they wanted a high-maintenance kitchen. They picked it because the photo on Instagram looked stunning and they couldn’t picture how it would look in their space, every morning, for the next ten years.
The cheapest insurance against a $5,000 mistake
There’s a sensible visualisation ladder, free to expensive. Use it.
Free brand 3D planners (IKEA’s Kitchen Planner, Kinsman, Kaboodle, U-Install-It) are excellent if you’re committed to that brand’s cabinetry. They’re product-locked (you can only use the brand’s own door styles, colours and dimensions), but if that brand is what you’re buying, they’ll show you the room before you commit.
Mood boards plus physical samples in your actual kitchen light is the under-rated free option. Order the largest tile sample your supplier offers, a full A4 cabinet door swatch (not a chip), a benchtop offcut. Put them in your kitchen at the time of day you’ll use it most. Live with them for a week. You’ll catch most colour and texture regrets this way for the price of postage.
Designer-led 3D renders bundled with a full kitchen design service ($500–$3,000+) are how kitchen companies have always handled this. The render is part of the design fee, the service is locked to that company’s product range, and you can’t take it elsewhere.
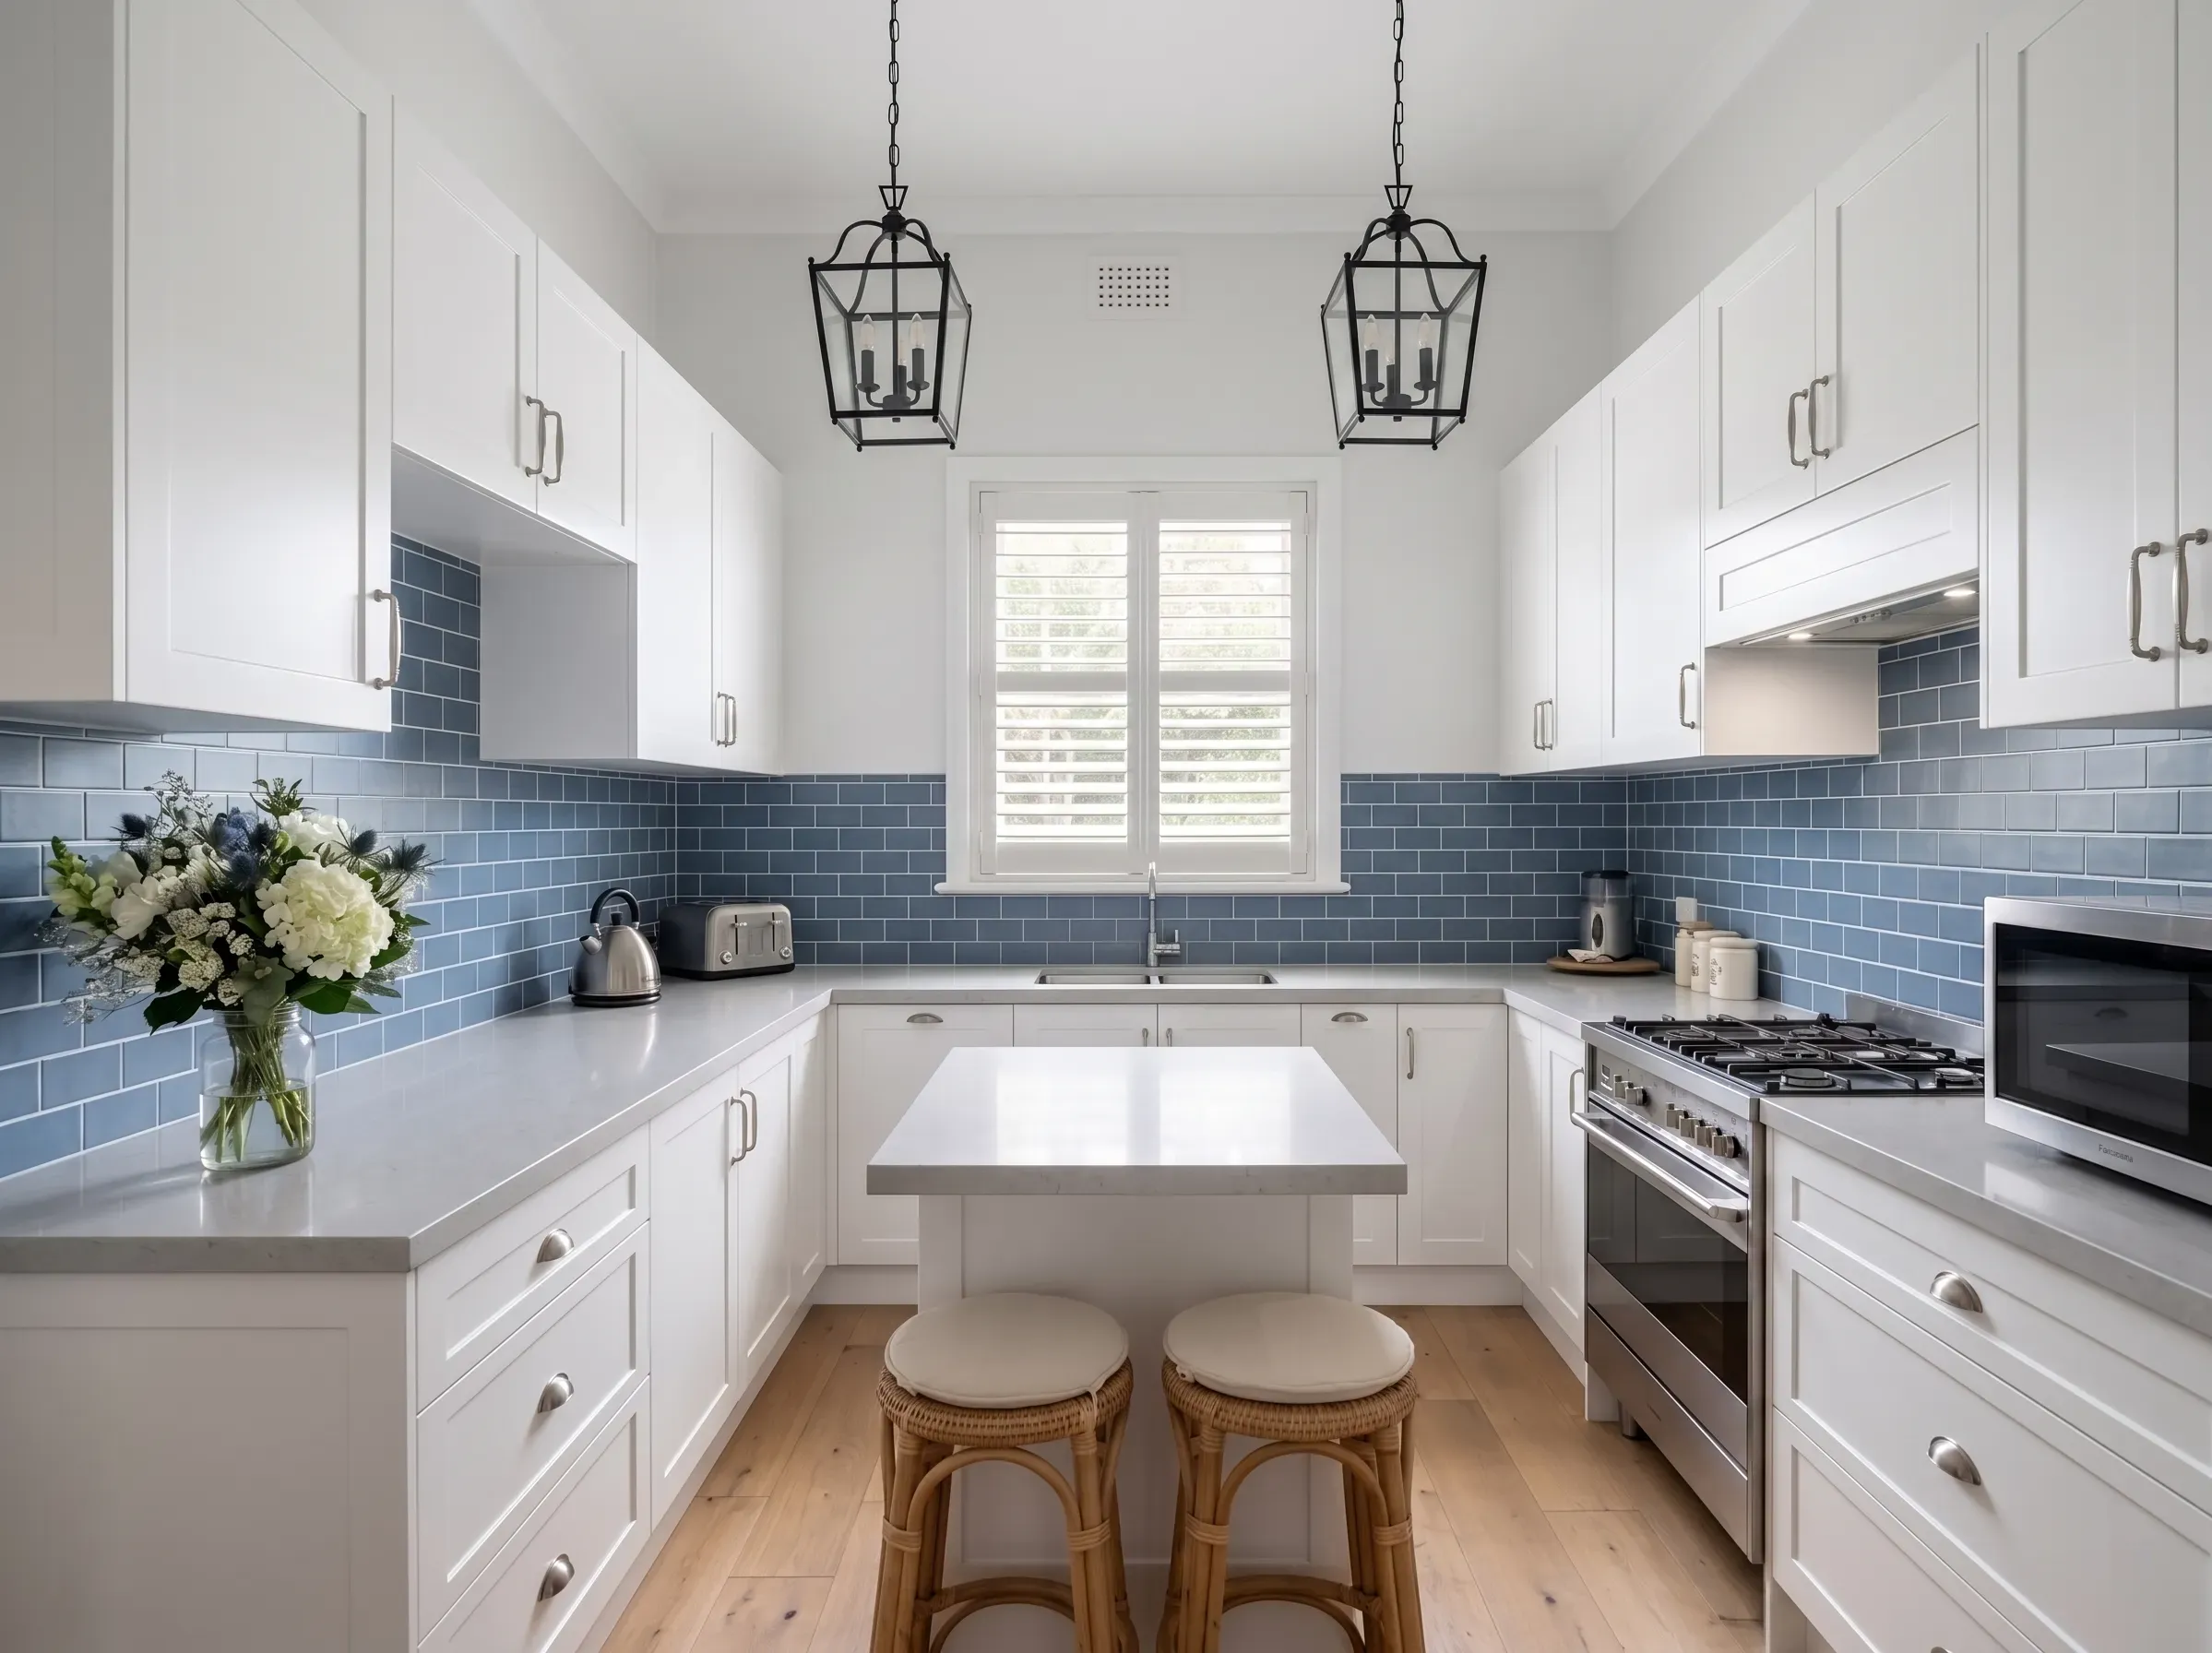
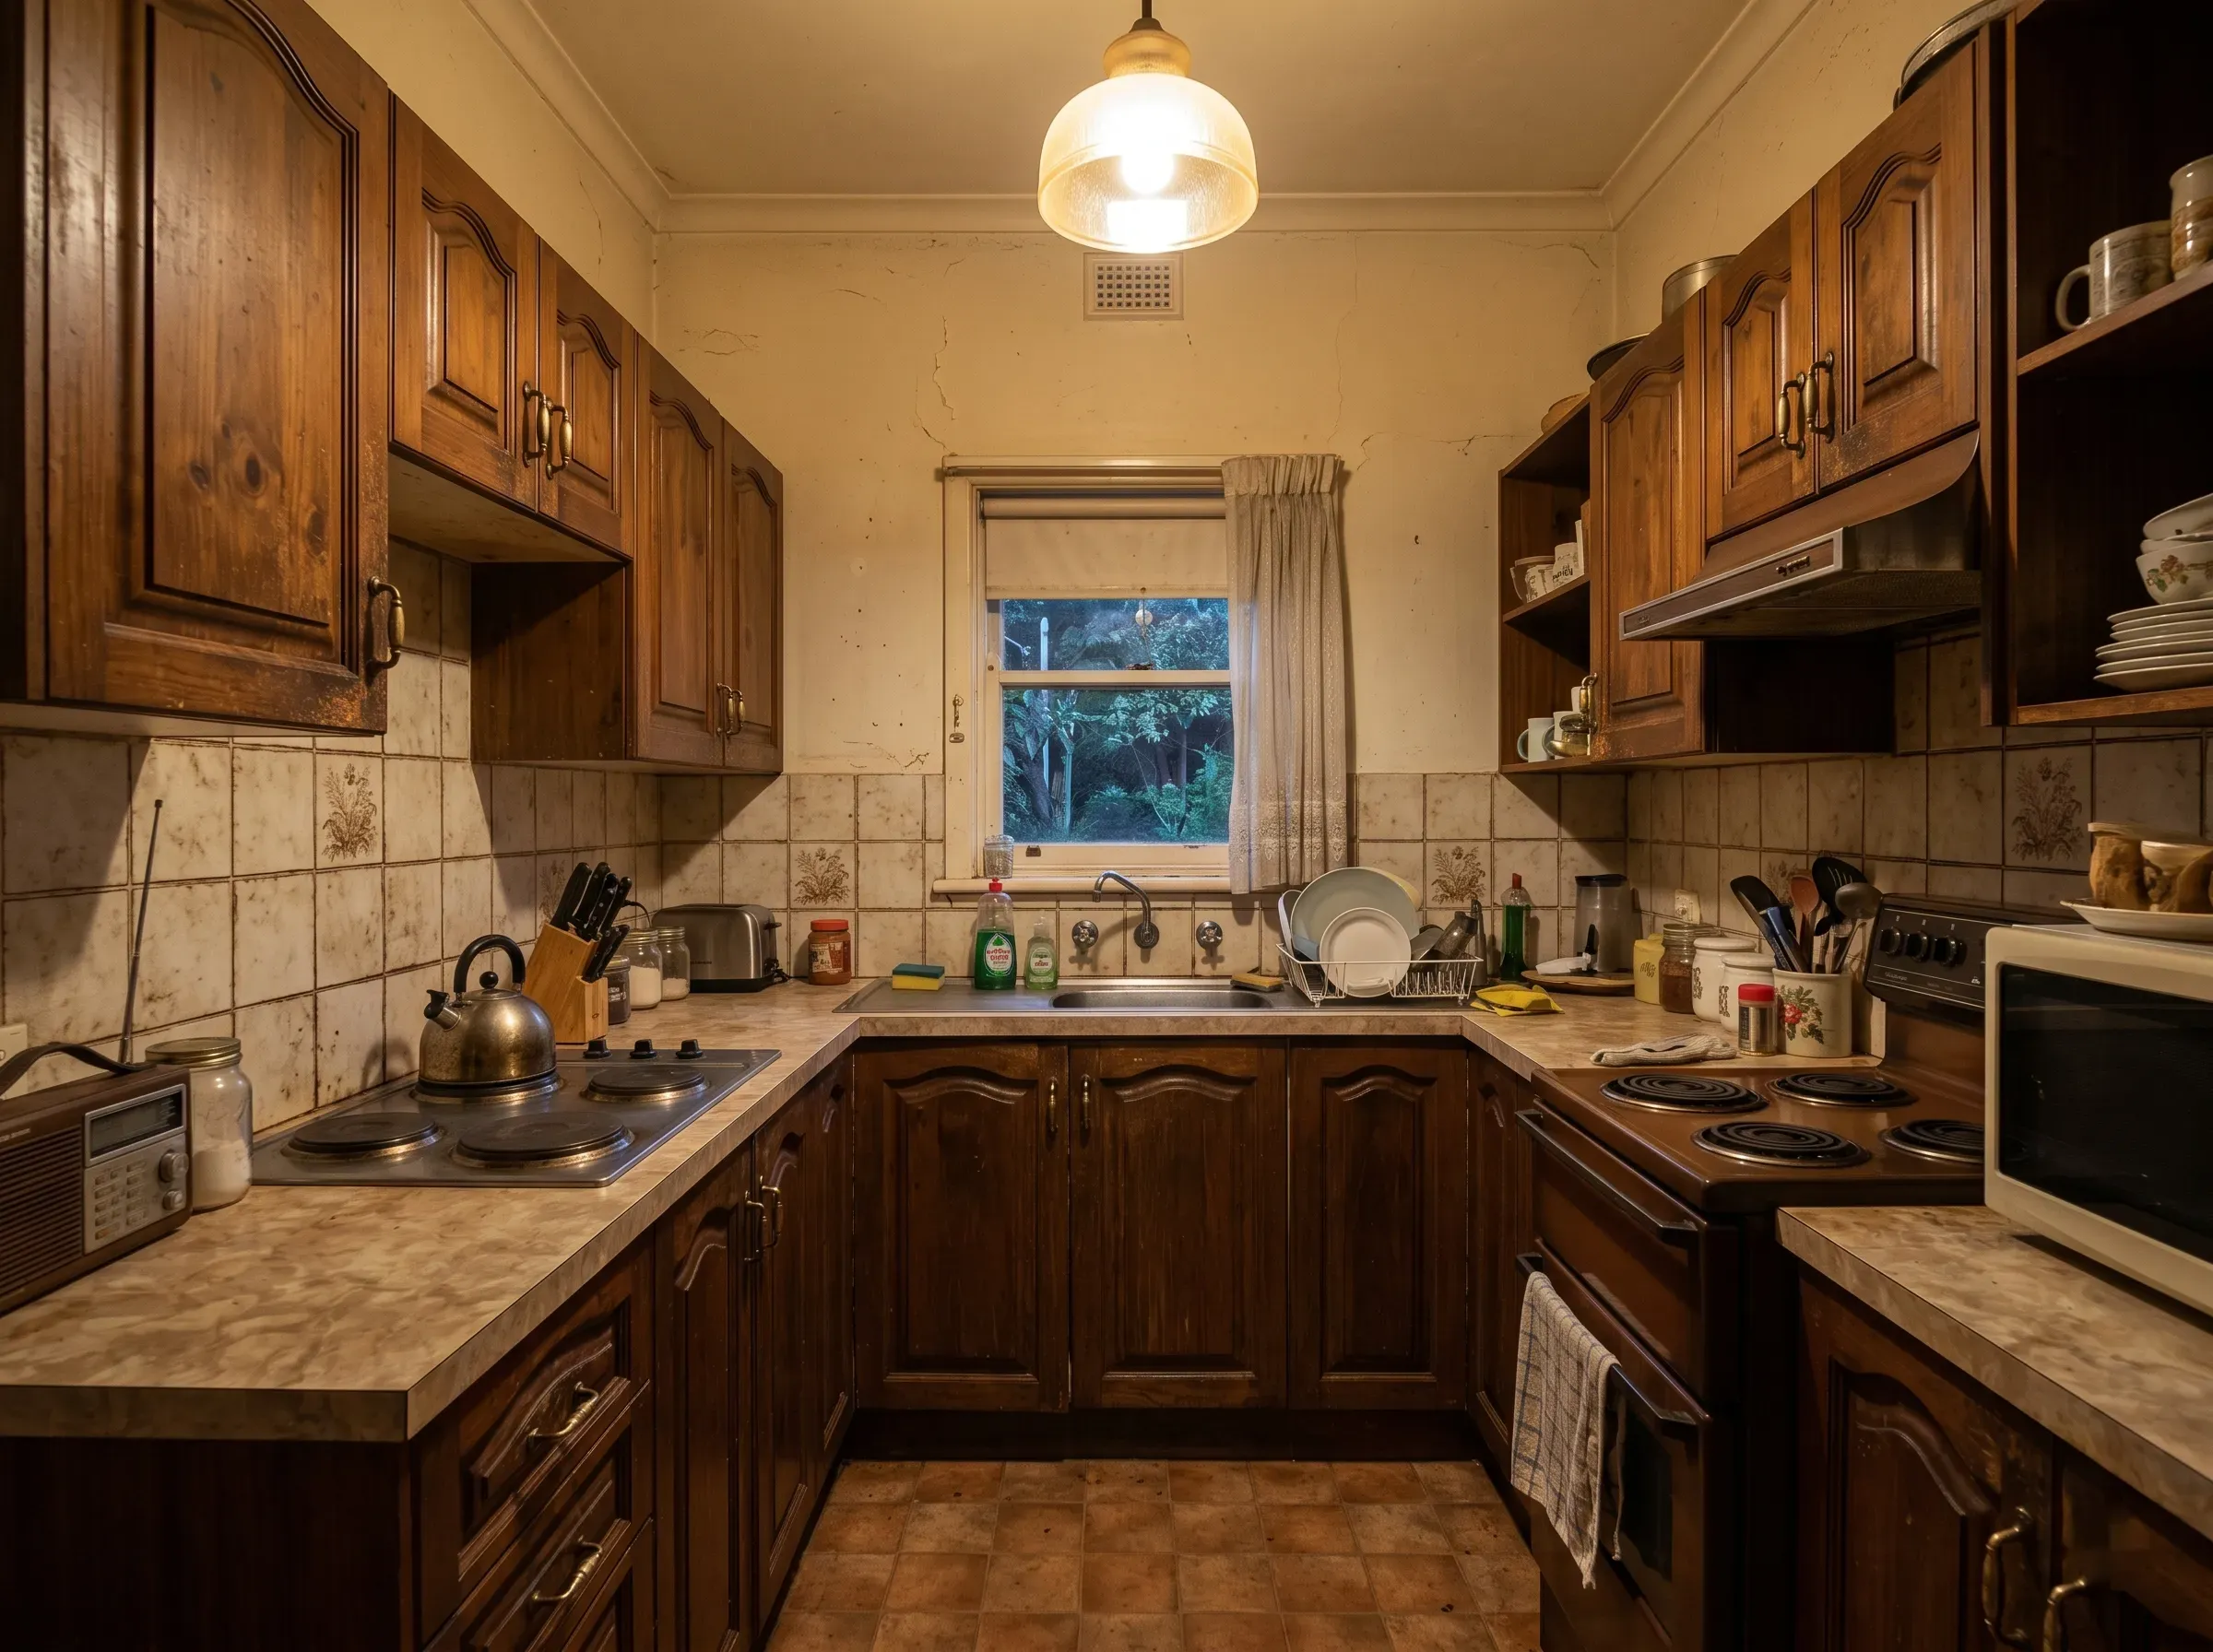
Standalone photoreal renders of your specific kitchen, brand-agnostic, around $100–$150 each. A phone photo of your existing kitchen, a brief describing the cabinets, benchtop, splashback, tapware and finishes you’re considering, a finished render back in 24 hours. That’s the service reIMG provides. We mention it because it’s the gap in the visualisation ladder above: a way to see your specific kitchen with your specific selections without being locked to one brand’s catalogue.
The framing is simple. If you can’t picture it, you can’t approve it. The cheapest moment to discover that the matt black cabinets look like fingerprint magnets is before the cabinet maker cuts the doors. The most expensive moment is the day you sign the variation invoice.
Your kitchen renovation decision sequence
A renovation has a natural order. Doing things out of order is one of the quiet ways budgets get destroyed, because every backwards step costs a redo. Here’s the sequence that works.
Phase 1: Vision (weeks 1–4). What is the kitchen for? Cooking, entertaining, family hub, all three? What works in your current kitchen? What doesn’t? Save 30–50 reference images on a single Pinterest board and look for what they have in common. Don’t shop yet.
Phase 2: Budget (weeks 2–4). Set the total number, set the contingency separately, decide whether you need finance. Talk to a broker if you do. Kitchen renovations under $50,000 are usually funded from savings, redraw, or a personal loan; bigger jobs often go on a home loan top-up.
Phase 3: Quotes and design (weeks 4–10). Get three itemised quotes from kitchen companies, builders, or a combination. This is the longest phase because cabinet design takes time and quotes take 2–3 weeks each to come back. Don’t rush it.
Phase 4: Selections and design lock (weeks 8–12). Cabinetry style and colour, benchtop material and colour, splashback, tapware, sink, handles, appliance package, flooring, lighting, paint colours. Every single one signed off before you sign the contract. This is the phase where a render saves you the most money. You’re committing to combinations you may have never seen together.
Phase 5: Contract (week 12). Itemised, fixed-price where possible, deposit at the legal cap (10% in NSW for jobs over $20,000), variation policy explicitly stated, payment milestones tied to completion stages.
Phase 6: Build (weeks 13–20). Demolition, cabinet manufacture (often 4–6 weeks lead time), trades on site in sequence, installation, defects walk-through, sign-off.
If your timeline feels shorter than this, that’s a sign you’re going to compress the selection phase, which is exactly where things go wrong.
Hidden costs people forget
These don’t appear in most kitchen company quotes. Budget for them separately.
- Skip hire and waste removal. $300–$600 for a 4 m³ skip; more if you fill more than one.
- Asbestos disposal. If you’re in a pre-1985 home, assume asbestos until tested. A test is $200–$500. Removal by a licensed contractor runs $1,500–$5,000 depending on volume.
- Permits and certifier fees. $500–$1,500 for a complying development certificate or DA, depending on state and scope.
- Switchboard upgrade. Going from gas to induction often requires a switchboard upgrade. $1,500–$3,500.
- Wall removal. Non-load-bearing $1,000–$3,000. Load-bearing walls require a structural engineer’s report and a steel beam ($5,000–$15,000).
- Designer or architect fees. 5–15% of the project value for a designer’s involvement; more for an architect.
- Builder’s margin on cost-plus contracts. 10–20% on every line, applied at billing.
- Accommodation. If your kitchen will be unusable for more than 3 weeks and you have a young family, factor in eating out or staying elsewhere.
- GST on variations. Every variation is a new line and a new GST charge.
A reasonable rule of thumb: take your kitchen company quote, add 8–12% for the costs above (more if you’re touching plumbing, electrical or walls), and that’s your real total before contingency.
Engineered stone, the 2024 ban, and what it means for your benchtop
Worth a brief explainer because it’s still confusing the market. Safe Work Australia banned the manufacture, supply and installation of engineered stone (the silica-heavy composite stone product that dominated Australian kitchens from 2010 to 2024) effective 1 July 2024, on workplace health grounds: silicosis among stonemasons. Existing engineered stone benchtops in homes are not affected. New installations are.
Your replacement options:
- Porcelain slab. The new mainstream choice. Photo-realistic stone looks, durable, heat-resistant, lower-silica. Expect to pay 10–20% more than engineered stone used to cost.
- Sintered stone. Similar performance to porcelain at a similar price.
- Natural stone (marble, granite, quartzite). Premium pricing, more maintenance, beautiful. The price gap to porcelain has narrowed.
- Laminate. Cheapest by a wide margin and surprisingly good in modern finishes. Realistic for budget kitchens.
- Timber. Warm, requires oiling, scratches. Best as a contrast surface (an island top) rather than the main run.
If a kitchen company is still quoting engineered stone, that’s a flag. They’re either using stale templates or running out old stock.
 Before
After
Before
After
When does a budget kitchen renovation actually pay off at sale?
The HIA’s data on Australian renovation ROI is consistent and worth knowing. Kitchens recoup 60–80% of their cost at sale, the strongest single-room return of any renovation type. Bathrooms are similar. Bedrooms, living rooms and outdoor decks return less.
The two things to be careful of:
Don’t over-capitalise. A $90,000 kitchen in a suburb where the median sale price is $650,000 won’t get its money back. Look at recent sales of comparable homes in your suburb. What do their kitchens look like? Match or slightly exceed. Don’t run away from the pack.
Renovate now, sell later. The ROI improves if you actually live in and enjoy the kitchen for 5+ years before selling. Renovating purely to sell, especially in a slow market, often returns less than the same money put into staging, marketing, and a competent agent.
If you’re 5+ years from selling and the kitchen is unpleasant to use, renovate. If you’re 12 months out, the maths usually says don’t.
The honest summary
The Australian kitchens that come in on budget all have the same handful of things in common. The owners set a real number with a real contingency. They didn’t move the plumbing. They got three itemised quotes. They locked every selection before the contract was signed. They saw the design before they committed to it. And they treated mid-build changes as the enemy, not as creative freedom.
The Australian kitchens that blow their budget all have the same handful of things in common too. They didn’t quite know what they wanted at the contract stage. They changed their mind once or twice during the build. The variations added up. The contingency wasn’t enough. They ended up with a kitchen they like but $8,000 over what they meant to spend.
The cheapest renovation is the one you got right the first time. The most expensive is the one you had to keep adjusting. Spend the time at the front of the project (on planning, on selections, on actually seeing what you’re committing to) and the build itself takes care of itself.
Frequently asked questions
What’s a realistic budget for a small Australian kitchen in 2026?
For a 10–15 m² kitchen, expect $8,000–$22,000 for a cosmetic refresh (painted cabinets, new handles, laminate benchtop), $15,000–$25,000 for a budget renovation with flat-pack cabinets, and $25,000–$45,000 for a mid-range renovation with semi-custom cabinetry and a stone or porcelain benchtop. The HIA national median sits around $30,000–$35,000. Add 10–20% for Sydney or Melbourne metro pricing.
How long does a kitchen renovation take?
Most mid-range Australian kitchen renovations take 3–8 weeks from demolition to first dinner cooked, depending on cabinet lead times. The build itself is usually 2–4 weeks; the rest is waiting for cabinetry to be manufactured. Plan to be without a working kitchen for 3–6 weeks and budget for takeaway or a temporary setup.
Cabinet maker, kitchen company or builder: who do I actually hire?
For a straightforward like-for-like replacement: a kitchen company (Kinsman, Freedom, IKEA, Kaboodle) handles design, manufacture and installation under one roof. For a custom kitchen with non-standard sizes or finishes: an independent cabinet maker plus your own trades. For anything that involves moving walls, plumbing or electrical: a licensed builder coordinating the whole job. The mistake is paying a builder’s margin on a job a kitchen company could have done end-to-end.
How much contingency should I hold back for a kitchen renovation?
10–20% of your total budget for newer homes, up to 25% for anything pre-1980. That sits on top of the contracted price, not inside it. The contingency is what absorbs mid-build surprises like asbestos, dodgy waterproofing, or the variation invoice when you change your mind on tiles. Homeowners who treat it as “extra money if I want it” almost always blow their budget.
Do I need council approval for a kitchen renovation?
For a like-for-like replacement in the same footprint with no structural changes, usually no. The moment you move plumbing, gas, electrical to a new wall, remove a wall, or change the building’s external envelope, you’re likely into a development application or complying development certificate. Rules vary by state, so check with your local council or a private certifier before quoting.
What’s the difference between a kitchen renovation and a kitchen remodel?
Nothing meaningful in Australia. “Remodel” is the American word; “renovation” or “reno” is what Australian tradies and homeowners use. The two terms cover the same scope of work. Most search results that show up under “kitchen remodel” are American articles with American pricing, so stick with Australian sources for accurate cost benchmarks.
What’s the single biggest reason kitchen renovations blow the budget?
Mid-build changes. Once the contract is signed and the trades are on site, every change becomes a “variation” charged at the builder’s margin plus GST, often with rework time on top. Industry guidance and Australian builders agree: the cheapest moment to change your mind is before the contract is signed. The most expensive moment is after the cabinets are installed.
Can I see what my kitchen will look like before I commit?
Yes, and you should. Free brand 3D planners (IKEA, Kinsman, Kaboodle) work if you’re committed to that brand’s cabinetry. Mood boards plus large supplier samples in your actual kitchen light catch most colour and texture mistakes for free. For a brand-agnostic photoreal render of your specific kitchen with your chosen finishes, services like reIMG turn a phone photo and a brief into a finished render in 24 hours for around $100–$150. Cheap insurance against a five-figure regret.